In Part 1 to 4, we went through solidity to develop smart contract in Remix, setup development environment, created unit testing methods for smart contract, created a front-end application with Node.js to interact with smart contracts. Now, we will deploy smart contract using truffle and infura. Also, will deploy Node.js application to Heroku.
Metamask
It is a browser extensions that allows users to make Ethereum transactions through regular websites. It manages your Ethereum wallet, which contains your Ethers (or money), and allows you to send and receive Ethers through a Dapp of interest. Here are the steps to install and setup Metamask:
- Go to https://metamask.io and install in your browser as extension
- Once installed, you see a fox on the right top of your browser. Once you click on it, you can now accept their terms & conditions
- you can create a new Ethereum account
- After creating an account, you get a list of 12 words that can be used to retrieve your account when you forget your password.
- MAKE SURE to save this Mnemonic Phrase somewhere SAFE. We will use it in the application for deployment.
If you have already Metamask installed then you can get the mnemonic phrase at Metamask > Settings > Reveal Seed Words.
Infura
Infura provides Infrastructure-as-a-service for Ethereum that lets your users run your application without requiring them to set up their own Ethereum node.
- Go to https://infura.io/register
- Submit registration form by filling in the relevant details
- Confirm the email verification
- Login to Infura
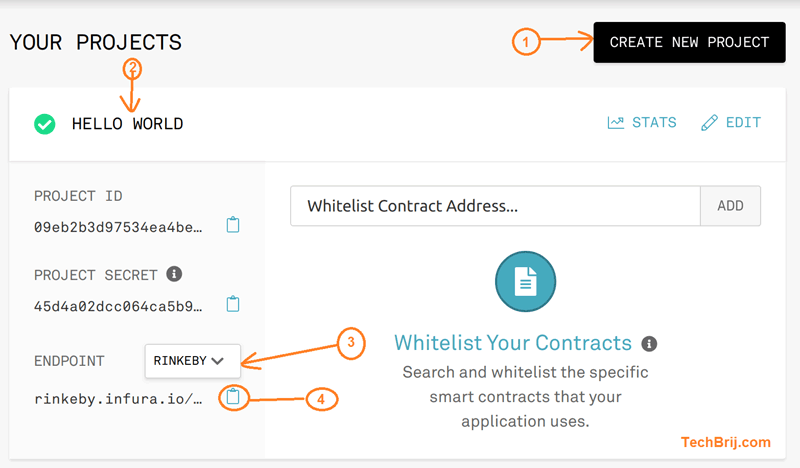
- Click "Create New Project" and enter project name
- Go to project, select Endpoint "RINKEBY"
- Copy the endpoint link. We will use it in our application for deployment.
Rinkeby
It is a Proof-of-Authority network, which means that blocks are signed by well-known trusted community members to prevents attackers from taking over the mining power on the network.
We need to get RINKEBY ether for testing.
- Visit https://faucet.rinkeby.io/ and follow instructions to get funds. For now, it needs link of social media share of ethereum account.
- Copy the ethereum account address from Metamask
- Paste account in any social media (Twitter, Google+ or Facebook)
- Copy the social media post having account and paste in faucet.rinkeby.io page
- Select proper options (generally 18.75 ethers/3 days preferred)
- Wait for few mins. You will get 18.75 in your account. You can check in Metamask.
Configurations
In previous post, we created .env file for environment variables. Add two more parameters for Mnemonics (from Metamask) and rinkeby endpoint URL (copied from Infura).
Now it looks like below:
PORT=3000
MODE="development"
LOCAL_NODE="http://localhost:7545"
REMOTE_NODE="https://rinkeby.infura.io/v3/0000011112222ea4be649f1459529999"
MNEMONIC = "horse doctor like tomato world tiger green step now remind solution pet"
If you want to deploy to a network other than localhost then you need to import a wallet provider and pass it your mnemonic.
Install Truffle's HDWalletProvider npm package:
npm install truffle-hdwallet-provider --save
Open truffle configuration file (truffle.js or truffle-config.js) and add rinkeby network information
const HDWalletProvider = require('truffle-hdwallet-provider');
require('dotenv').config();

module.exports = {
  networks: {
    development: {
     host: "127.0.0.1",     // Localhost (default: none)
     port: 7545,            // Standard Ethereum port (default: none)
     network_id: "*",       // Any network (default: none)
    },
    rinkeby:{
      provider: () => new HDWalletProvider(process.env.MNEMONIC,process.env.REMOTE_NODE),
      network_id: 4
    }
  },

  mocha: {
    // timeout: 100000
  },
  // Configure your compilers
  compilers: {
    solc: {
    }
  }
}
Run following command to deploy:
truffle migrate --network rinkeby
You will get following output:
Starting migrations...
======================
> Network name:    'rinkeby'
> Network id:      4
> Block gas limit: 7000000


1_initial_migration.js
======================

   Deploying 'Migrations'
   ----------------------
   > transaction hash:    0x1085d8d3ff6a90a9b25b3145c54bb6e7537266b5adffae1646921af017ad8284
   > Blocks: 2            Seconds: 17
   > contract address:    0x45a70bddaAd93d570F70B046ff59494680734Ff4
   > account:             0xa28cDaa9174F381908093f0DE431c1Bbe1eAdf90
   > balance:             18.710119687
   > gas used:            284908
   > gas price:           20 gwei
   > value sent:          0 ETH
   > total cost:          0.00569816 ETH


   > Saving migration to chain.
   > Saving artifacts
   -------------------------------------
   > Total cost:          0.00569816 ETH


1546163703_hello_world.js
=========================

   Deploying 'HelloWorld'
   ----------------------
   > transaction hash:    0x57d824a24fffc89de256d068ac8f5575acbd06bef857a0fc5805784f4806c418
   > Blocks: 1            Seconds: 9
   > contract address:    0xCd8b17560781316ed0cf2b7Cf87b730e493c07fC
   > account:             0xa28cDaa9174F381908093f0DE431c1Bbe1eAdf90
   > balance:             18.697030907
   > gas used:            612405
   > gas price:           20 gwei
   > value sent:          0 ETH
   > total cost:          0.0122481 ETH


   > Saving migration to chain.
   > Saving artifacts
   -------------------------------------
   > Total cost:           0.0122481 ETH


Summary
=======
> Total deployments:   2
> Final cost:          0.01794626 ETH
To verify deployment, go to https://rinkeby.etherscan.io/ and enter transaction hash.
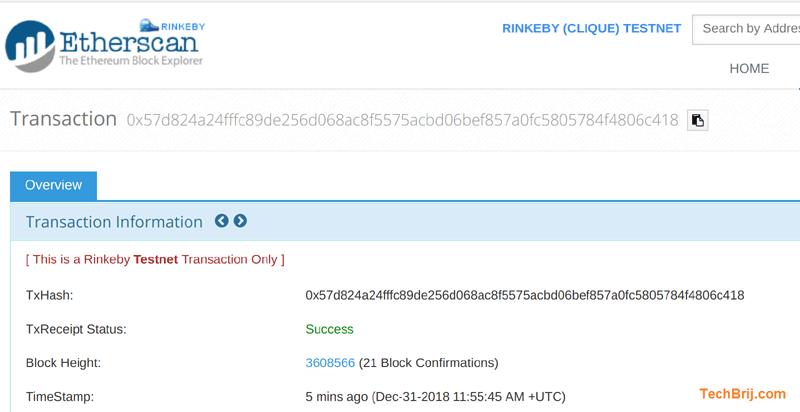
Congratulations if you deployed your smart contract successfully!
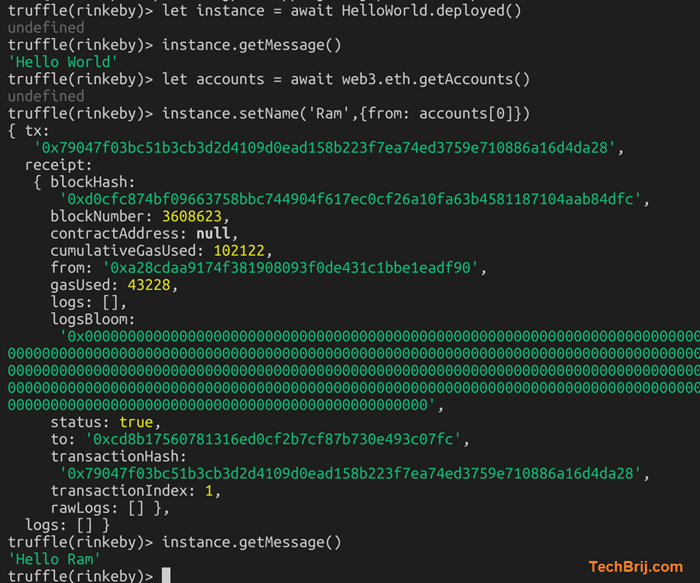
You can test the deployed smart contract as we did in part-2
truffle console --network rinkeby
let instance = await HelloWorld.deployed()
instance.getMessage()
It should return Hello World. Let’s call setName method.
let accounts = await web3.eth.getAccounts()
instance.setName('Ram',{from: accounts[0]})
instance.getMessage()
It should return Hello Ram.
Deploy Frontend on Heroku
Now we have to deploy our frontend application to Heroku.
- Visit https://signup.heroku.com/
- Submit registration form
- Do email verification
- Login Heroku
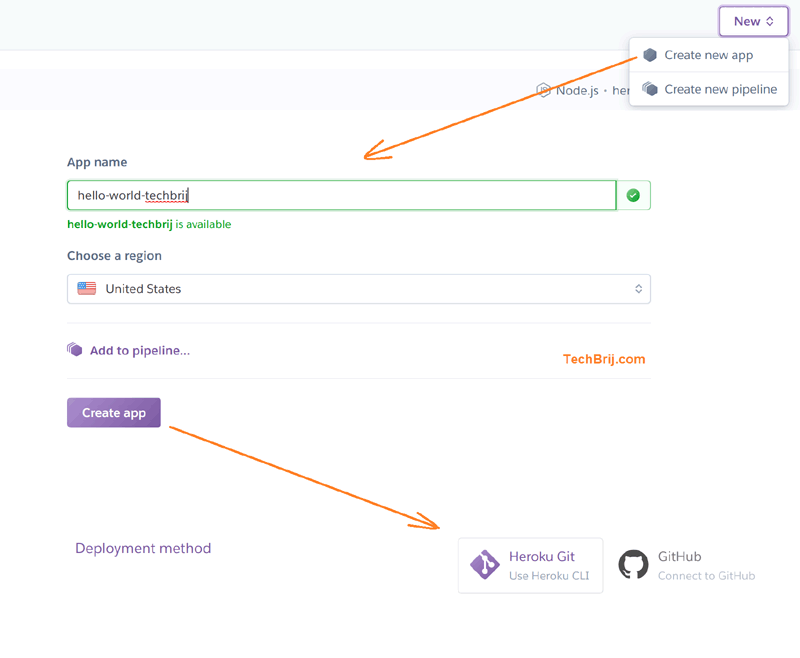
- Right side, click New > Create New App > enter information > Create App
- Download and Install heroku-cli from here
First create .gitignore file with following content to skip .env and node_modules folder commit.
.env
/node_modules
As in client/app.js we set to skip web3 currentprovider in development mode in previous tutorial.
initWeb3 : async function (){
        if (process.env.MODE == 'development' || typeof window.web3 === 'undefined'){
            App.web3Provider = new Web3.providers.HttpProvider(process.env.LOCAL_NODE);
        }
        else{
             App.web3Provider = web3.currentProvider;
        }
so change .env file to set production mode.
MODE="production"
run the webpack again to update code and check for any error in production mode:
npm run webpack
create a Procfile to define startup command for Heroku.
web: npm run start
Now login to Heroku account on terminal by running following command
heroku login
It will need login on browser. After login, you can setup repository.
git init
heroku git:remote -a <heroku-app-name>
Commit your code to the repository and deploy it to Heroku using Git.
git add .
git commit -am "Initial Version"
git push heroku master
You will get npm installation logs in terminal, at last you will get like below
remote: -----> Compressing...
remote:        Done: 21.7M
remote: -----> Launching...
remote:        Released v3
remote:        https://your-heroku-app.herokuapp.com/ deployed to Heroku
remote:
remote: Verifying deploy... done.
To https://git.heroku.com/your-heroku-app.git
 * [new branch]      master -> master
Open the link and run the application.
In case of any error, you can check live logs
heroku logs --tail
Note: always run webpack first before deploying front-end application.
Test the App
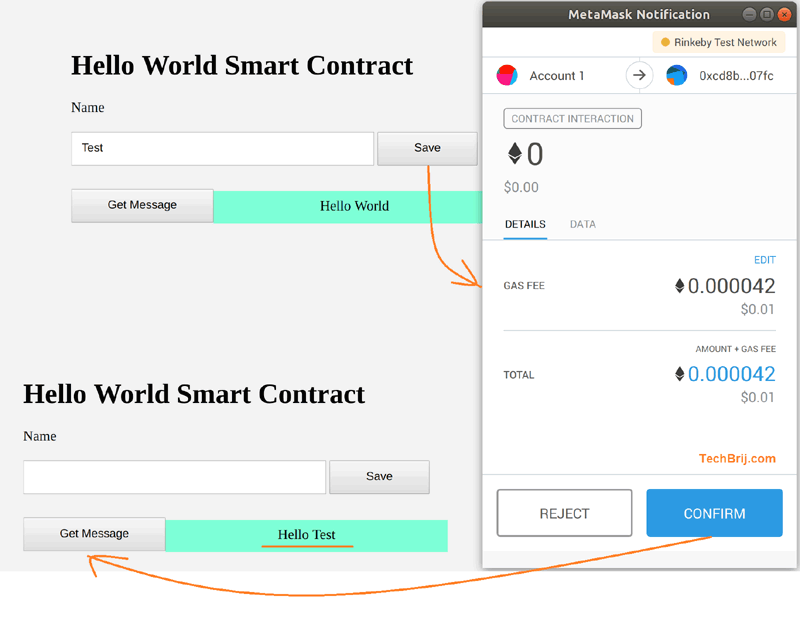
To test the deployed application, first login to MetaMask and select Rinkeby network. Your account must have balance. if not, follow Rinkeby section of this post to get it. Open your Heroku app URL in the browser. By default, "Hello World" message is displayed. When you set any name and click on Save button then Metamask popup will appear. You have to confirm the transaction and wait for few seconds until you get "saved successfully" message. After that, on "Get Message" button click, you will get the name populated with Hello.
Source Code
Conclusion
Finally, we have deployed what we made in the whole series of blog posts on public network. We deployed smart contract using Infura, Rinkeby and MetaMask, verified it and tested it using Truffle console. Also, we deployed our front-end application on Heroku and saw how to do transaction using MetaMask.
Hope, it is interesting for you. Enjoy Blockchain :)