MEAN stack is a full JavaScript solution that helps you build fast, robust and maintainable production web applications using MongoDB, ExpressJS, AngularJS and Node.js.
Sails.js allows you to build custom, enterprise-grade Node.js apps using the Model-View-Controller pattern to organize your code so it is easier to maintain.
New MEAN Stack = MongoDB+ExpressJS+AngularJS+Node.js+Sails.js = MEANS stack
This article explains how to implement a simple CRUD by integrating AngularJS with Sails REST APIs.
Video:
Environment:
This post uses following software and modules:
Node.JS v0.10.26
MongoDB v2.4.6
Sails.JS v0.10.5
Windows 7
Node.JS Installation:
1. Go to Node.JS Official site, download Windows Installer and then execute it. that's it.
MongoDB Installation:
2. Go to MongoDB official site, download the zip file.
You can unzip it anywhere you like. For simplicity, I am defining path here. So in next steps, it is easy to understand for you to define relative path at your end.
Extract the downloaded zip file in E:\mongodb folder and create data and logs folder in it.
create mongodb.conf file and define db and log path in the file:
#This is an example config file for MongoDB
#basic
dbpath = E:\mongodb\data
port = 12345
logpath = E:\mongodb\logs\mongo.log
Open command prompt with "Run as administrator".
To configure a windows service for MongoDB, run following command in command prompt.
// note that following should go only in only one line
mongod -f "E:\mongodb\mongodb.conf"
     --install --serviceName mongodb12345
     --serviceDisplayName "MongoDB Server Instance 12345"
     --serviceDescription "MongoDB Server Instance running on 12345"
To start the service, run following command:
net start mongodb12345
If you want to stop the service
net stop mongodb12345
If you want to remove the service, use following:
// note that following should go only in only one line
mongod -f "E:\mongodb\mongodb.conf"
     --remove --serviceName mongodb12345
     --serviceDisplayName "MongoDB Server Instance 12345"
     --serviceDescription "MongoDB Server Instance running on 12345"
To connect Mongodb, run following command
mongo --port 12345
To see list of databases
show dbs
To create new database (name= sampledb)
use sampledb
To confirm that the session has the sampledb database as context
db
it returns the name of the current database
Sails.js Installation:
3. Open command prompt with "Run As Administrator" in windows, go do directory you want to create app and type following to install Sails:
cd e:\nodejs\myapp
npm install sails
To Set path of sails
set path=%path%;E:\nodejs\myapp\node_modules\.bin
Note: You can install it globally then no need to configure path.
To add bower support for Sails:
npm install sails-generate-bower
Creating Sails.js App:
4. Create new application (say myproject).
sails new myproject
You will get files created in myproject folder.
Setting Up Bower
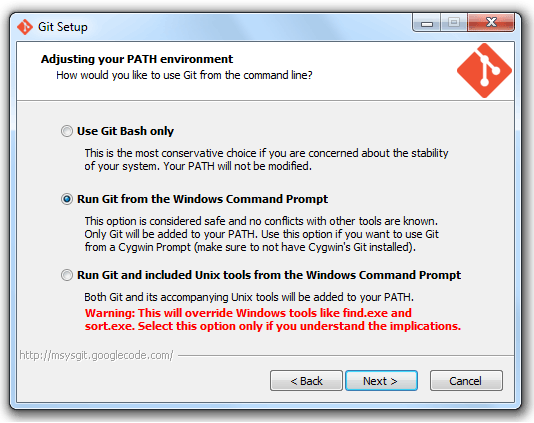
5. Bower is a package manager for the web.
To use Bower on Windows, you must install msysgit correctly. Be sure to check the option shown below:
To setup bower
cd myproject
sails generate bower
npm install
To set path of bower:
set path=%path%;E:\nodejs\myapp\myproject\node_modules\grunt-bower-task\node_modules\.bin
There are some issues of installed version of bower, so we need to update it
cd node_modules\grunt-bower-task\

npm uninstall --save bower
npm install --save bower
It will update the existing bower package. Make sure you have bower 1.3.8 or newer.
now back to the project folder
cd e:\nodejs\myapp\myproject

bower cache clean

bower install --save jquery
bower install --save bootstrap
bower install --save requirejs
bower install --save angular
In bower.json, you will find the packages in dependencies:
"dependencies": {
    "jquery": "~2.1.1",
    "bootstrap": "~3.2.0",
    "requirejs": "~2.1.15",
    "angular": "~1.2.26"
  }
You will get the packages installed in assets\vendor folder.
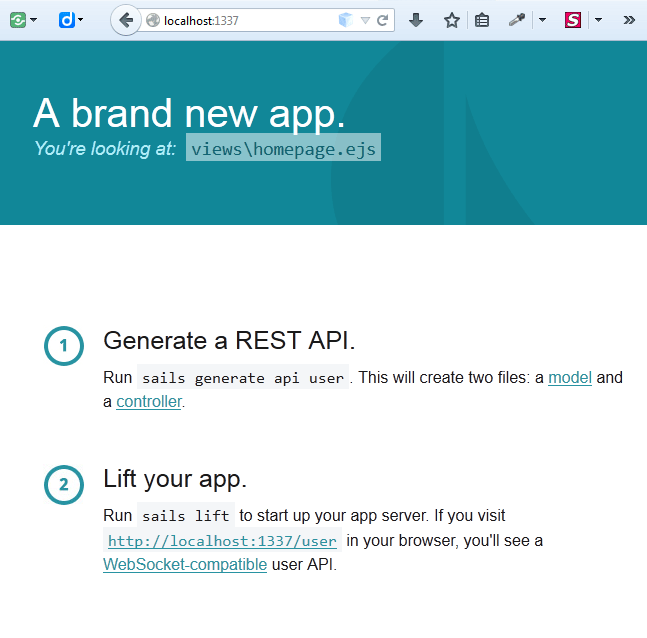
Now lift the server:
sails lift
At this point, if you visit (http://localhost:1337/) you will see the default home page.
To check bower installed files, open following jquery file:
http://localhost:1337/vendor/jquery/jquery.js
Configure MongoDB:
6. run following command to install sails-mongo
npm install sails-mongo --save
Open config\connections.js, define mongodb database details.
module.exports.connections = {
Mongodb: {
    adapter: 'sails-mongo',
    host: 'localhost',
    port: 12345,
    user: '',
    password: '',
    database: 'sampledb'
  }
  }
Open config\models.js, set Mongodb as connection
module.exports.models = {
  connection: 'Mongodb'
}
You can also specify your connections in config\local.js to avoid commiting sensitive data to your repository.
module.exports = {
connections: {
      Mongodb: {
    adapter: 'sails-mongo',
    host: 'localhost',
    port: 12345,
    user: '',
    password: '',
    database: 'sampledb'
  }
  }
}
Generating a REST API:
7. Sails is a rapid prototyping platform , API generation is faster and easier in Sails .
sails generate api employee
This generate an API which can search, paginate, sort, filter, create, destroy, update, and associate employees. You can check API at following location:
http://localhost:1337/employee
Sails actually generates a new Model "Employee" (api\models\Employee.js) and a Controller file EmployeeContoller ( api\controllers\EmployeeController.js).
By default, The generated model has no attribute. Let's add three attributes name, email and phone in api\models\Employee.js.
module.exports = {

  attributes: {

	  name:{
        type:"string",
        required:true,
        minLength: 2
      },
      email:{
        type:"email",
        required:"true",
        unique: true
      },
	  phone:{
        type:"string",
        required:true
      }
  }
};
Now Sails provides auto-generated APIs. You can inserted values as
http://localhost:1337/employee/create?name=Brij&email=test@techbrij.com&phone=123-456-7890
and you will get below output:
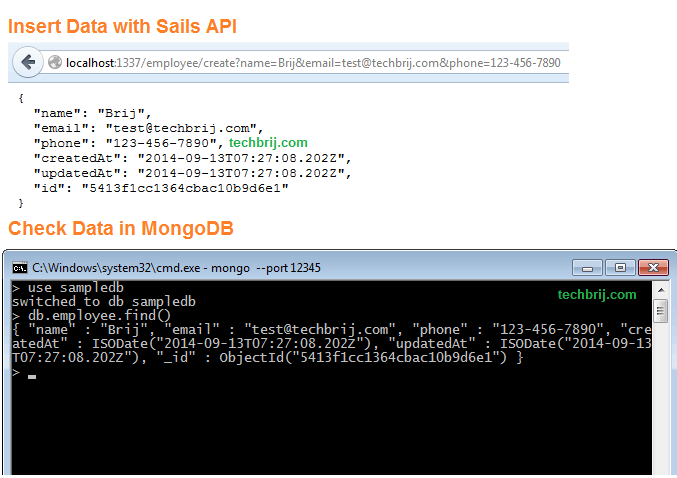
You can make sure the data is properly inserted in MongoDB database as above.
You can find data by id with "/employee/id" format:
http://localhost:1337/employee/5413f1cc1364cbac10b9d6e1
8. In /api/controllers/EmployeeController.js, we can add a method to render the index page:
module.exports = {
	index: function (req, res) {
    res.view(null, {
        title: "Employee"
    });
  }
};
It will render the "Views\employee\index.ejs" (We will create it after few steps)
9. In assets/js folder create main.js file
require.config({
urlArgs: "bust=" + (new Date()).getTime(),
paths: {
'angular': '../vendor/angular/angular',
'jquery': '../vendor/jquery/jquery',
'bootstrapJs': '../vendor/bootstrap/bootstrap'
},
/**
* for libs that either do not support AMD out of the box, or
* require some fine tuning to dependency mgt'
*/
shim: {
'bootstrapJs': ['jquery'],
'angular': {'exports': 'angular'}
}
});
window.name = "NG_DEFER_BOOTSTRAP!";
require([
'angular',
'app',
'bootstrapJs'
], function(angular, app) {
'use strict';
var $html = angular.element(document.getElementsByTagName('html')[0]);
angular.element().ready(function() {
angular.resumeBootstrap([app.name]);
});
}
);
Notice at the top where we set the window.name to "NG_DEFER_BOOTSTRAP!". That will keep angular from initializing until we tell it to. Near the bottom after everything is loaded, we call angular.resumeBootstrap(). That is where angular picks back up and finishes initializing.
10. Create assets/js/app.js file to this:
define(['angular','controllers'], function (angular) {
	'use strict';
	var app =  angular.module('employee', [
    	'controllers'
    ]);
    return app;
});
Angular Controller:
11. Create asset/js/controllers.js file
define(function (require) {

  var angular = require('angular'),
      Controllers = angular.module('controllers', []);

  Controllers.controller('angEmpController', require('controllers/angEmployeeController'));

  return Controllers;

});
12. Create controllers folder in assets\js folder and create angEmployeeController.js file in it.
define(function () {
    return ['$scope', '$http', function($scope, $http) {


function resetItem(){
   $scope.employee = {
      name : '',
      email : '',
      phone : '',
      id : ''
   };
   $scope.displayForm = '';

}
resetItem();

 $scope.addItem = function () {
   resetItem();
   $scope.displayForm = true;
 }


$scope.saveItem = function () {
  var emp = $scope.employee;
      if (emp.id.length == 0){
            $http.get('/employee/create?name=' + emp.name + '&email=' +  emp.email + '&phone=' +  emp.phone).success(function(data) {
              $scope.items.push(data);
              $scope.displayForm = '';
              removeModal();
            }).
  error(function(data, status, headers, config) {
    alert(data.summary);
  });
          }
          else{
            $http.get('/employee/update/'+ emp.id +'?name=' + emp.name + '&email=' +  emp.email + '&phone=' +  emp.phone).success(function(data) {
              $scope.displayForm = '';
              removeModal();
            }).
  error(function(data, status, headers, config) {
    alert(data.summary);
  });
          }
        };

$scope.editItem = function (data) {
        $scope.employee = data;
        $scope.displayForm = true;
}

        $scope.removeItem = function (data) {
          if (confirm('Do you really want to delete?')){
            $http['delete']('/employee/' + data.id).success(function() {
              $scope.items.splice($scope.items.indexOf(data), 1);
            });
          }
        };

        $http.get('/employee/find').success(function(data) {
          for (var i = 0; i < data.length; i++) {
            data[i].index = i;
          }
          $scope.items = data;
        });

        function removeModal(){
          $('.modal').modal('hide');
      }

    }];
});
Views:
13. Open Views\layout.ejs file and add a line to instantiate our Angular application. We will replace the html tag with this:
<html lang="en" ng-app>
By default, CSS references:
 <link rel="stylesheet" href="/vendor/bootstrap/bootstrap.css">
 <link rel="stylesheet" href="/styles/importer.css">
Next, we need to go to bottom and keep reference of require.js only. Here is the structure:
<body>
    <%- body %>
    <script src="/vendor/requirejs/require.js" data-main="/js/main"></script>
  </body>
14. In the views, create folder employee and add index.ejs file
<div class="container">
<div ng-controller="angEmpController">

<button class="btn btn-primary btn-lg" data-toggle="modal" data-target="#myModal" ng-click="addItem()">Add</button>
     <div class="row h3">
 		  <div class="col-md-3">Name</div>
          <div class="col-md-3">Email</div>
          <div class="col-md-3">Phone</div>
          <div class="col-md-3"></div>
     </div>

        <div class="row" ng-repeat="item in items">
          <div class="col-md-3" ng-bind="item.name"></div>
          <div class="col-md-3" ng-bind="item.email"></div>
          <div class="col-md-3" ng-bind="item.phone"></div>
          <div class="col-md-3">
           <button class="btn btn-primary" data-toggle="modal" data-target="#myModal" ng-click="editItem(item)">Edit</button>
           <button class="btn" ng-click="removeItem(item)">Remove</button></div>
        </div>


<!-- Modal -->
<div class="modal fade" id="myModal" tabindex="-1" role="dialog" aria-labelledby="myModalLabel" aria-hidden="true" ng-show="displayForm">
  <div class="modal-dialog">
    <div class="modal-content">
      <div class="modal-body">

 		  <div class="form-group">  <input type="text" ng-model="employee.name"  class="form-control" placeholder="Name"/></div>
          <div class="form-group"><input type="text" ng-model="employee.email"  class="form-control" placeholder="Email"/></div>
          <div class="form-group"> <input type="text" ng-model="employee.phone"  class="form-control" placeholder="Phone"/></div>

      </div>
      <div class="modal-footer">
     	 <button class="btn btn-primary" ng-click="saveItem()">Save</button>
     	 <button type="button" class="btn btn-default" data-dismiss="modal">Close</button>
      </div>
    </div>
  </div>
</div>
</div>
</div>
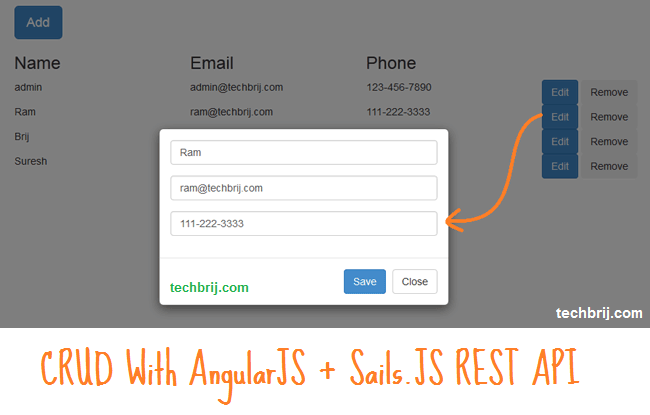
Output:
Source Code:
The code from this post is available on GitHub.
Conclusion:
In this post, We saw basic installation and configuration of Node.js, MongoDB and Sails.js, have a fully functional CRUD API, created the front-end with Angular.js and consumed these services.
Enjoy MEANS Stack !!