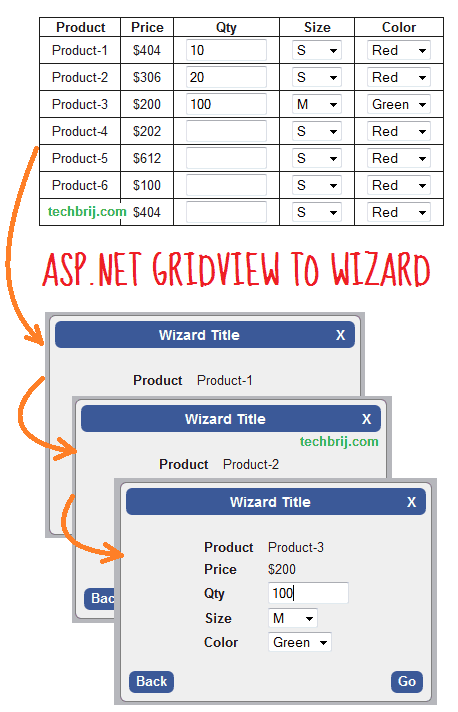
In my post, I explained how we can create a simple wizard using jQuery. In this post, we'll see how asp.net gridview can be displayed in wizard format. Sometimes, gridview is used to take input from user when multiple fields are required many times. It is not user friendly, We can use wizard but not easy to handle on server side as in gridview. So, It's better to convert ASP.NET gridview to jQuery wizard. So, no need to change on server side and UI is also more user convenient. We'll convert gridview structure to wizard structure as explained in this post and use wizard.js.
HTML Source:
<asp:GridView ID="GridView1" runat="server" AutoGenerateColumns="False">
<Columns>
<asp:BoundField DataField="Product" HeaderText="Product" />
<asp:BoundField DataField="Price" HeaderText="Price" />
<asp:TemplateField HeaderText="Qty">
<ItemTemplate>
<asp:TextBox ID="txtQty" runat="server" MaxLength="5" Width="75px" ></asp:TextBox>
</ItemTemplate>
</asp:TemplateField>
<asp:TemplateField HeaderText="Size">
<ItemTemplate>
<asp:DropDownList ID="ddlSize" runat="server">
<asp:ListItem Text="S" Value="S"></asp:ListItem>
<asp:ListItem Text="M" Value="M"></asp:ListItem>
<asp:ListItem Text="L" Value="L"></asp:ListItem>
<asp:ListItem Text="XL" Value="XL"></asp:ListItem>
<asp:ListItem Text="XXL" Value="XXL"></asp:ListItem>
</asp:DropDownList>
</ItemTemplate>
</asp:TemplateField>
<asp:TemplateField HeaderText="Color">
<ItemTemplate>
<asp:DropDownList ID="ddlColor" runat="server">
<asp:ListItem Text="Red" Value="1"></asp:ListItem>
<asp:ListItem Text="Green" Value="2"></asp:ListItem>
<asp:ListItem Text="Blue" Value="3"></asp:ListItem>
</asp:DropDownList>
</ItemTemplate>
</asp:TemplateField>
</Columns>
</asp:GridView>
<div id="wizHolder" style="margin:70px auto;">
<div id="title"> Wizard Title<a class="closeButton">X</a></div>
<ul id="wizard"></ul>
</div>
First, you have to include jQuery and wizard.js file. The logic of conversion is simple, traverse gridview row by row and create a new table having Gridview's header and current data row as two columns and put in wizHolder > ul > li. So our objective is to create structure something like this:
<table>
<tbody>
	<tr>
		<th>Product</th>
		<td>Product-1</td>
	</tr>
	<tr>
		<th>Price</th>
		<td>$404</td>
	</tr>
	.....
</tbody>
</table>
Script Source:
To convert Gridview:
				var wiz = $('#wizard');
                    $('#<%=GridView1.ClientID %> tr:not(:first)').each(function () {
                        var row = this;
                        var tbl = $('<table/>');
                        $('td', $(this)).each(function (index) {
                            var tr = $('<tr/>');
                            tr.append($('#<%=GridView1.ClientID %> th').eq(index).clone());
                            tr.append($(this).clone());
                            tbl.append(tr);
                        });
                        wiz.append($('<li></li>').append(tbl));
                    });
					  $('#<%=GridView1.ClientID %>').remove();
To convert HTML Table:
If you have to convert HTML Table instead of asp.net gridview, replace <%=GridView1.ClientID %> with your table ID in above code.
To configure wizard:
				var setting = {
                        ctrls: $("#wizard li"), //Structure for Steps
                        nextButtonTitle: 'Go',
                        nextButtonCss: 'btnNext',
                        callBack: btnNextClicked,
                        previousButtonTitle: 'Back',
                        previousButtonCss: 'btnBack',
                        validateWizardStep: validateStep,
                        validateWizardByTitle: validateByTitle,
                        initStep: 0
                    };
                    showWizardScreen(setting);
Same setting is used in which btnNextClicked, validateStep and validateByTitle are functions. See this post for more details about functions.
Hope, It helps. Enjoy playing with jQuery !!!