It's a step by step tutorial to implement custom role provider and authorization in ASP.NET MVC 4.0 with EF 4.x DB First approach.
Step 1: Create new ASP.NET MVC 4 Web Application > Template: Internet Application, View Engine: Razor.
Add Models:
Step 2: Right Click on Models folder > Add > New Item > Select "ADO.NET Entity Data Model" > Enter Name "SampleModel.edmx" > Add
Select "Generate From Database" > Next
Select Database Connection (New Connection if doesn't exist), Make sure "Save entity connection setting in web.config as" option true and Enter Name "SampleDBEntities" > Next
Select Your tables and stored proc which is related to role functionality, Enter ModelNamespace "SampleDBModel" > Finish.
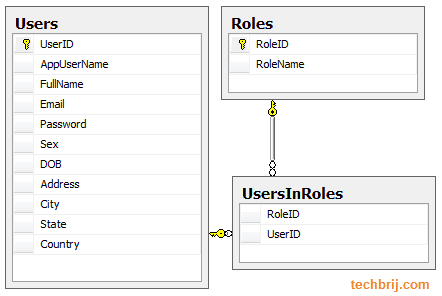
Let us consider following table structure:
Custom RoleProvider:
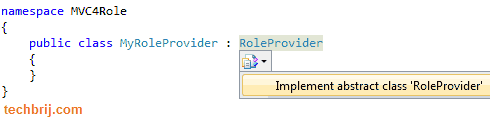
Step 3: Right Click on Project in Solution Explorer > Add New Item > Class > Enter Name: MyRoleProvider.cs
Step 4: Import following namespace and Inherit this class to RoleProvider.
using System.Web.Security;
using <your project namespace>.Models;
Step 5: Click on RoleProvider > Select "Implement abstract class" option. It'll generate methods of RoleProvider.
Read Also: Custom role provider based sitemap navigation in asp.net
Step 6: implement GetRolesForUser method, It takes username and returns all roles related to user.
 public override string[] GetRolesForUser(string username)
        {
            using (SampleDBEntities objContext = new SampleDBEntities())
            {
                var objUser = objContext.Users.FirstOrDefault(x => x.AppUserName == username);
                if (objUser == null)
                {
                    return null;
                }
                else
                {
                    string[] ret = objUser.Roles.Select(x => x.RoleName).ToArray();
                    return ret;
                }
            }
        }
You can implement above method as per your database structure. Build the Project.
Step 7: In web.config update RoleManager Tag and define MyRoleProvider class.
    <roleManager defaultProvider="CustomRoleProvider" enabled="true" cacheRolesInCookie="false">
      <providers>
        <clear />
        <add name="CustomRoleProvider" type="MVC4Role.MyRoleProvider"  />
      </providers>
    </roleManager>
Customize Login:
Step 8: Now in AccountController > Login HttpPost action, We'll validate user as per our database structure.
		[AllowAnonymous]
        [HttpPost]
        public ActionResult Login(LoginModel model, string returnUrl)
        {
            if (ModelState.IsValid)
            {
                using (SampleDBEntities objContext = new SampleDBEntities())
                {
                    var objUser = objContext.Users.FirstOrDefault(x => x.AppUserName == model.UserName  && x.Password == model.Password);
                    if (objUser == null)
                    {
                        ModelState.AddModelError("LogOnError", "The user name or password provided is incorrect.");
                    }
                    else
                    {
                        FormsAuthentication.SetAuthCookie(model.UserName, model.RememberMe);

                        if (Url.IsLocalUrl(returnUrl) && returnUrl.Length > 1 && returnUrl.StartsWith("/")
                           && !returnUrl.StartsWith("//") && !returnUrl.StartsWith("/\\"))
                        {
                            return Redirect(returnUrl);
                        }
                        else
                        {
                            //Redirect to default page
                            return RedirectToAction("RedirectToDefault");
                        }
                    }
                }
            }
            // If we got this far, something failed, redisplay form
            return View(model);
        }
In above method, we are validating username and password and redirect on successful login. You can create custom membership provider, implement ValidateUser method and use it here to check validation.
Role Based Redirection:
Step 9: You might want role based redirection on successful login. To implement this, let us create one more action say RedirectToDefault.
 public ActionResult RedirectToDefault()
        {

            String[] roles = Roles.GetRolesForUser();
            if (roles.Contains("Administrator"))
            {
                return RedirectToAction("Index","Admin");
            }
            else if (roles.Contains("Dealer"))
            {
                return RedirectToAction("Index", "Dealer");
            }
            else if (roles.Contains("PublicUser"))
            {
                return RedirectToAction("Index", "PublicUser");
            }
            else
            {
                return RedirectToAction("Index");
            }
        }
Why New Action?
Now one question arises, why to create separate action for this? We can put direct if else in same login action. If we do this then GetRolesForUser or User.IsInRole will not work. FormsAuthentication requires one redirection to set cookies...etc. That's why we redirects to another action and redirect again to action as per user role.
For testing, Create two new empty controllers say Admin and Dealer and create views of default actions.
Admin View:
@{
    ViewBag.Title = "Index";
}
<h2>Welcome</h2>
This is Admin Area !!!
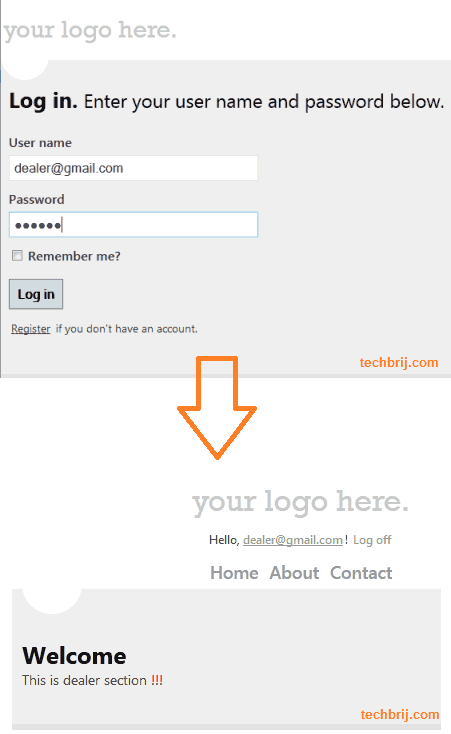
Dealer View:
@{
    ViewBag.Title = "Index";
}

<h2>Welcome</h2>

This is dealer section !!!
Note: In ASP.NET MVC 4, default template login is based on ajax. So for testing, open <base url>/Account/login. Similarly, you can update JsonLogin action.
Authorization:
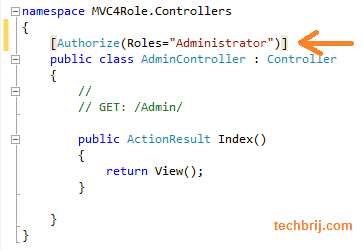
Step 10: You can use Authorize attribute to restrict access by callers to an action method. You can put Authorize attribute on any action or whole controller. Suppose you want to give Admin controller access to admin role only then use
[Authorize(Roles="Administrator")]
No other user can access this controller actions.
You can assign multiple roles also. suppose you want to give Dealer controller access to dealer and administrators. then
 [Authorize(Roles = "Dealer,Administrator")]
    public class DealerController : Controller
    {
...
    }
If dealer tries to access admin controller It will be redirected to login page.
Hope, It helps.