In my previous post, I explained how to implement custom role provider, authorization and role based navigation on successful login in asp.net mvc 4. In this post, We'll implement role based menu.
In default template of asp.net mvc 4.0, Layout.cshtml has following code for menu:
<nav>
                        <ul id="menu">
                            <li>@Html.ActionLink("Home", "Index", "Home")</li>
                            <li>@Html.ActionLink("About", "About", "Home")</li>
                            <li>@Html.ActionLink("Contact", "Contact", "Home")</li>
                        </ul>
                    </nav>
Which is hard-coded for all users. We'll create partial view for menu to reduce complexity.
Right click on Shared folder in Views > select Add > click View
Enter Name: _Menu and set "Create as a partial view" option true > click Add
It'll open blank cshtml page.
Define Menu Items:
In normal asp.net webforms app, Sitemap file is used to define structure. Here we'll define menu details in partial view.
@{
    var menus = new[]
                {
                   new { LinkText="Home", ActionName="Index",ControllerName="Home",Roles="All"  },
                   new { LinkText="About", ActionName="About",ControllerName="Home",Roles="Anonymous"  },
                   new { LinkText="Contact", ActionName="Contact",ControllerName="Home",Roles="Anonymous"  },
                   new { LinkText="Dashboard", ActionName="Index",ControllerName="Dealer",Roles="Dealer"  },
                   new { LinkText="Dashboard", ActionName="Index",ControllerName="Admin",Roles="Administrator"  },
                   new { LinkText="Administration", ActionName="GetUsers",ControllerName="Admin",Roles="Administrator"  },
                   new { LinkText="My Profile", ActionName="GetDealerInfo",ControllerName="Dealer",Roles="Dealer,PublicUser"  },
                   new { LinkText="Products", ActionName="GetProducts",ControllerName="Product",Roles="Dealer,Administrator"  },
                   new { LinkText="Search", ActionName="SearchProducts",ControllerName="Product",Roles="PublicUser,Dealer,Administrator"  },
                   new { LinkText="Purchase History", ActionName="GetHistory",ControllerName="Product",Roles="PublicUser"  },

                };
}
In above code, An Array of anonymous object having LinkText, ActionName, ControllerName, Roles properties is used.
I've given some additional roles which doesn't belong to user roles like:
All : To display link for both authenticated or anonymous users
Anonymous: To display link for unauthenticated users
Get Role Based Links:
We've to get links from above menu structure with following points:
1. If user is not authenticated, Show links having All or Anonymous role.
2. If user is authenticated and has single role, Show links having All or user-role role.
3. If user is authenticated and has multiple roles, show links having All or ANY user-role role.
Note: A user may have multiple roles and in menu structure, a link may have multiple roles.
<ul id="menu">
@if (HttpContext.Current.User.Identity.IsAuthenticated)
{
    String[] roles = Roles.GetRolesForUser();
    var links = from item in menus
                where item.Roles.Split(new String[] { "," }, StringSplitOptions.RemoveEmptyEntries)
                .Any(x => roles.Contains(x) || x == "All")
                select item;
    foreach (var link in links)
    {
        @: <li> @Html.ActionLink(link.LinkText, link.ActionName,link.ControllerName)</li>
    }
}
else{
    var links = from item in menus
                where item.Roles.Split(new String[]{","},StringSplitOptions.RemoveEmptyEntries)
                .Any(x=>new String[]{"All","Anonymous"}.Contains(x))
                select item;
     foreach ( var link in links){
         @: <li> @Html.ActionLink(link.LinkText, link.ActionName, link.ControllerName)</li>
     }
}
</ul>
In above code, Linq is used to get links for both authenticated and unauthenticated user in partial view. It will get links and makes ul li structure.
Add Menu:
Now, we have to use this partial view in layout page. If we directly call this, It will be called in each request and the entire logic is executed again and again. So we'll use session to store HTML string of menu and use session to display menu for further request.
In _Layout.cshtml page, replace nav tag with following structure:
					<nav>
                         @if (Session["MyMenu"] == null){
                            Session["MyMenu"] = Html.Partial("~/Views/Shared/_Menu.cshtml");
                          }
                         @Session["MyMenu"]
                    </nav>
We've to clear session in login and logout actions.
In Login action, clear it just after setting FormsAuthentication cookies:
 FormsAuthentication.SetAuthCookie(model.UserName, model.RememberMe);
 Session["MyMenu"] = null;
and in LogOff action:
public ActionResult LogOff()
        {
            FormsAuthentication.SignOut();
            Session["MyMenu"] = null;
            return RedirectToAction("Index", "Home");
        }
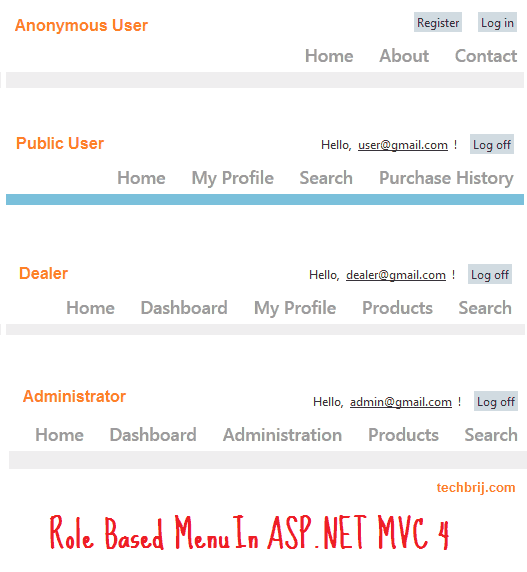
Output
See following output of above menu structure for different roles in asp.net mvc default template.
Hope, It helps. Share your opinion about how you are implementing role based navigation in ASP.NET MVC.