This tutorial explains the following things in ASP.NET MVC:
1. How to upload multiple files using HTML5 multiple file input with additional model data.
2. How to save files to a specific path on the server (Not in database).
3. How to allow to upload file with same name. Different users can upload files with same name.
4. How to download the uploaded file.
5. How to manage files in edit mode.
6. How to use Entity Framework for CRUD operations with parent child table structure.
Getting started:
Environment:
Visual Studio 2012, ASP.NET MVC 5, Entity Framework 6, SQL Server LocalDb 11.0
Set up the Project:
1. File > New Project > ASP.NET MVC 5 Empty Project > Enter Solution Name & Path > OK
2. In Web.Config, add your database connection-string
<connectionStrings>
    <add name="DefaultConnection" providerName="System.Data.SqlClient" connectionString="Data Source=(LocalDb)\v11.0;Initial Catalog=aspnet-MVC4Drop-20150918165325;Integrated Security=SSPI;AttachDBFilename=|DataDirectory|\aspnet-MVC4Drop-20150918165325.mdf" />
  </connectionStrings>
To install EntityFramework, run the following command in the Package Manager Console
Install-Package EntityFramework
Models:
We are going to implement following table structure:
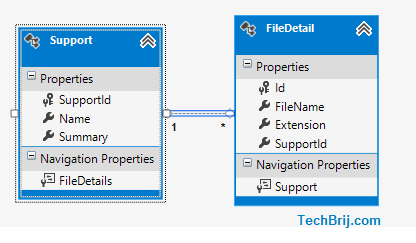
3. Right Click on Models folder > Add > Class (Enter name: Support) and use following code
 public class Support
    {
        public int SupportId { get; set; }

        [Required(ErrorMessage = "Please Enter Your Name")]
        [Display(Name = "Name")]
        [MaxLength(100)]
        public string Name { get; set; }

        [Required(ErrorMessage = "Please Enter Summary")]
        [Display(Name = "Summary")]
        [MaxLength(500)]
        public string Summary { get; set; }

        public virtual ICollection<FileDetail> FileDetails { get; set; }

    }
4. Similarly, add FileDetail model:
 public class FileDetail
    {
        public Guid Id { get; set; }
        public string FileName { get; set; }
        public string Extension { get; set; }
        public int SupportId { get; set; }
        public virtual Support Support { get; set; }

    }
The FileDetail entity has one-to-many relationship with support entity. Here GUID is used as primary key.
5. Add context class (SupportContext) and use following code:
  public class SupportContext : DbContext
    {
        public SupportContext()
            : base("name=DefaultConnection")
        {
        }
        public DbSet<Support> Supports { get; set; }
        public DbSet<FileDetail> FileDetails { get; set; }
    }
Application Flow:
Here is the app flow going to implement.
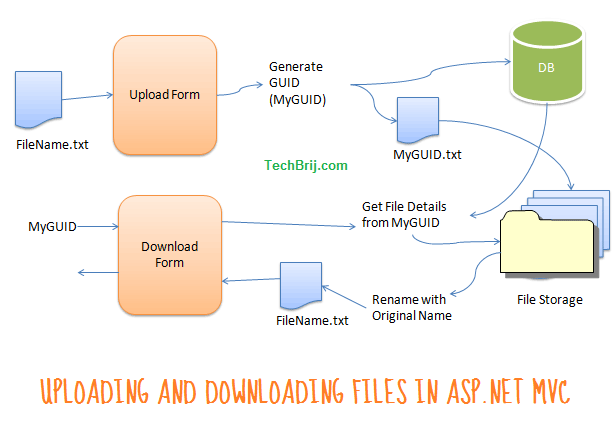
When user uploads a document, A GUID is generated and it is stored as key in database with file information. The file name is changed with GUID and it is saved on specific server path. As we are using GUID as name so user can upload multiple files with same name. At the time downloading, the GUID is used to get file and file information and the name is changed with original.
6. Use following code in Shared\_Layout.cshtml.
<!DOCTYPE html>
<html>
<head>
    <meta charset="utf-8" />
    <meta name="viewport" content="width=device-width" />
    <title>@ViewBag.Title</title>
    <link href="~/Content/Site.css" rel="stylesheet" type="text/css" />
    <link href="~/Content/bootstrap.min.css" rel="stylesheet" type="text/css" />
    <script src="~/Scripts/modernizr-2.6.2.js"></script>
</head>
<body>
    @RenderBody()

    <footer>
        Visit <a href="https://techbrij.com">TechBrij.com</a> for more information.
    </footer>


    <script src="~/Scripts/jquery-1.10.2.min.js"></script>
    <script src="~/Scripts/bootstrap.min.js"></script>
    @RenderSection("scripts", required: false)
</body>
</html>
7. Add an Empty Controller > Enter name: SupportController and use following code
  public class SupportController : Controller
    {
        private SupportContext db = new SupportContext();

		protected override void Dispose(bool disposing)
        {
            db.Dispose();
            base.Dispose(disposing);
        }
    }
Create Form:
8. Add the following actions for Get and Post requests in SupportController
 public ActionResult Create()
        {
            return View();
        }


        [HttpPost]
        [ValidateAntiForgeryToken]
        public ActionResult Create(Support support)
        {
            if (ModelState.IsValid)
            {
                List<FileDetail> fileDetails = new List<FileDetail>();
                for (int i = 0; i < Request.Files.Count; i++)
                {
                    var file = Request.Files[i];

                    if (file != null && file.ContentLength > 0)
                    {
                        var fileName = Path.GetFileName(file.FileName);
                        FileDetail fileDetail = new FileDetail()
                        {
                            FileName = fileName,
                            Extension = Path.GetExtension(fileName),
                            Id = Guid.NewGuid()
                        };
                        fileDetails.Add(fileDetail);

                        var path = Path.Combine(Server.MapPath("~/App_Data/Upload/"), fileDetail.Id + fileDetail.Extension);
                        file.SaveAs(path);
                    }
                }

                support.FileDetails = fileDetails;
                db.Supports.Add(support);
                db.SaveChanges();
                return RedirectToAction("Index");
            }

            return View(support);
        }
In above method, Request.Files are used to get all submitted files. GUID is generated for each file and file is saved with the generated GUID + extension. A list of FileDetail objects are created and it is assigned to Support entity navigation property. Entity Framework automatically sets up one to many relationship.
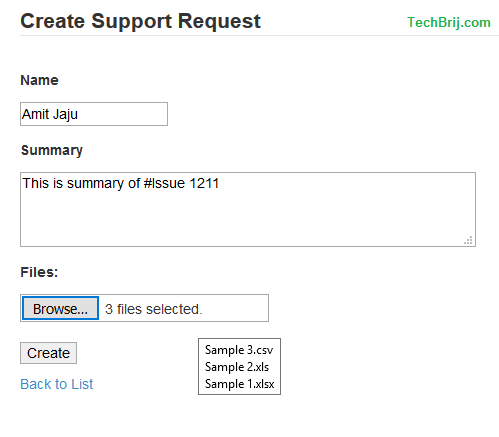
9. Add View of Create action and use following code in Create.cshtml file.
@model MultipleFileUpload.Models.Support

@{
    ViewBag.Title = "Create";
}


@using (Html.BeginForm("Create", "Support", null, FormMethod.Post, new { enctype = "multipart/form-data" }))
{
    @Html.AntiForgeryToken()
    @Html.ValidationSummary(true)

    <fieldset>
        <legend>Create Support Request</legend>

        <div class="editor-label">
            @Html.LabelFor(model => model.Name)
        </div>
        <div class="editor-field">
            @Html.EditorFor(model => model.Name)
            @Html.ValidationMessageFor(model => model.Name)
        </div>

        <div class="editor-label">
            @Html.LabelFor(model => model.Summary)
        </div>
        <div class="editor-field">
            @Html.TextAreaFor(model => model.Summary)
            @Html.ValidationMessageFor(model => model.Summary)
        </div>
        <div class="editor-label">
          <label>Files:</label>
        </div>
        <div class="editor-field">
            <input type="file" name="file" multiple="multiple" />
        </div>
        <p>
            <input type="submit" value="Create" />
        </p>
    </fieldset>
}

<div>
    @Html.ActionLink("Back to List", "Index")
</div>

@section Scripts {
    <script src="~/Scripts/jquery.validate.min.js"></script>
    <script src="~/Scripts/jquery.validate.unobtrusive.min.js"></script>
}
Edit Form:
10. Add following actions for edit form
  public ActionResult Edit(int? id)
        {
            if (id == null)
            {
                return new HttpStatusCodeResult(HttpStatusCode.BadRequest);
            }
            Support support = db.Supports.Include(s => s.FileDetails).SingleOrDefault(x => x.SupportId == id);
            if (support == null)
            {
                return HttpNotFound();
            }
            return View(support);
        }

	 [HttpPost]
        [ValidateAntiForgeryToken]
        public ActionResult Edit(Support support)
        {
            if (ModelState.IsValid)
            {

                //New Files
                for (int i = 0; i < Request.Files.Count; i++)
                {
                    var file = Request.Files[i];

                    if (file != null && file.ContentLength > 0)
                    {
                        var fileName = Path.GetFileName(file.FileName);
                        FileDetail fileDetail = new FileDetail()
                        {
                            FileName = fileName,
                            Extension = Path.GetExtension(fileName),
                            Id = Guid.NewGuid(),
                            SupportId = support.SupportId
                        };
                        var path = Path.Combine(Server.MapPath("~/App_Data/Upload/"), fileDetail.Id + fileDetail.Extension);
                        file.SaveAs(path);

                        db.Entry(fileDetail).State = EntityState.Added;
                    }
                }

                db.Entry(support).State = EntityState.Modified;
                db.SaveChanges();
                return RedirectToAction("Index");
            }
            return View(support);
        }
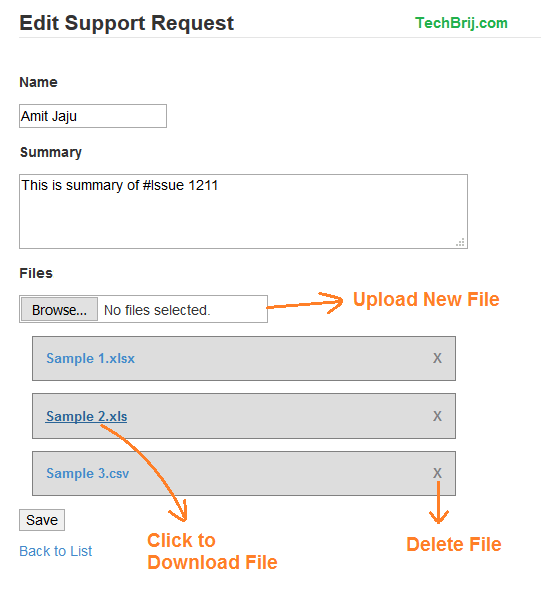
11. Add View of Edit action and use following code:
@model MultipleFileUpload.Models.Support

@{
    ViewBag.Title = "Edit";
}


@using (Html.BeginForm("Edit", "Support", null, FormMethod.Post, new { enctype = "multipart/form-data" }))
{
    @Html.AntiForgeryToken()
    @Html.ValidationSummary(true)

    <fieldset>
        <legend>Edit Support Request</legend>

        @Html.HiddenFor(model => model.SupportId)

        <div class="editor-label">
            @Html.LabelFor(model => model.Name)
        </div>
        <div class="editor-field">
            @Html.EditorFor(model => model.Name)
            @Html.ValidationMessageFor(model => model.Name)
        </div>

        <div class="editor-label">
            @Html.LabelFor(model => model.Summary)
        </div>
        <div class="editor-field">
            @Html.TextAreaFor(model => model.Summary)
            @Html.ValidationMessageFor(model => model.Summary)
        </div>
        <div class="editor-label">
           <label>Files:</label>
        </div>
        <div class="editor-field">
            <input type="file" name="file" multiple="multiple" />

            <ul class="attachment">
                @foreach (var item in Model.FileDetails)
                {
                    <li>
                        <a class="title" href="/Support/Download/?p=@(item.Id + item.Extension)&[email protected]">@item.FileName</a>
                        <a href="javascript:void(0);" data-id="@item.Id" class="deleteItem">X</a>
                    </li>
                }
            </ul>
        </div>
        <p>
            <input type="submit" value="Save" />
        </p>
    </fieldset>
}

<div>
    @Html.ActionLink("Back to List", "Index")
</div>

@section Scripts {
    <script src="~/Scripts/jquery.validate.min.js"></script>
    <script src="~/Scripts/jquery.validate.unobtrusive.min.js"></script>

 }
Download File:
12. In Edit view, All associated files are displayed as link. Add following action to allow user to download the file.
  public FileResult Download(String p, String d)
        {
            return File(Path.Combine(Server.MapPath("~/App_Data/Upload/"), p), System.Net.Mime.MediaTypeNames.Application.Octet, d);
        }
For simplicity, we are passing both p (modified name) and d (original name) to action instead of getting file information from the database. You can also use HTML5 download attribute to change the name on download but it is not cross browser compatible.
Delete File:
13. As you can see, in edit mode, user can delete the individual file. Add following JavaScript in Edit view:
 $('.deleteItem').click(function (e) {
            e.preventDefault();
            var $ctrl = $(this);
            if (confirm('Do you really want to delete this file?')) {
                $.ajax({
                    url: '@Url.Action("DeleteFile")',
                    type: 'POST',
                    data: { id: $(this).data('id') }
                }).done(function (data) {
                    if (data.Result == "OK") {
                        $ctrl.closest('li').remove();
                    }
                    else if (data.Result.Message) {
                        alert(data.Result.Message);
                    }
                }).fail(function () {
                    alert("There is something wrong. Please try again.");
                })

            }
        });
and add following action:
  [HttpPost]
        public JsonResult DeleteFile(string id)
        {
            if (String.IsNullOrEmpty(id))
            {
                Response.StatusCode = (int)HttpStatusCode.BadRequest;
                return Json(new { Result = "Error" });
            }
            try
            {
                Guid guid = new Guid(id);
                FileDetail fileDetail = db.FileDetails.Find(guid);
                if (fileDetail == null)
                {
                    Response.StatusCode = (int)HttpStatusCode.NotFound;
                    return Json(new { Result = "Error" });
                }

                //Remove from database
                db.FileDetails.Remove(fileDetail);
                db.SaveChanges();

                //Delete file from the file system
                var path = Path.Combine(Server.MapPath("~/App_Data/Upload/"), fileDetail.Id + fileDetail.Extension);
                if (System.IO.File.Exists(path))
                {
                    System.IO.File.Delete(path);
                }
                return Json(new { Result = "OK" });
            }
            catch (Exception ex)
            {
                return Json(new { Result = "ERROR", Message = ex.Message });
            }
        }
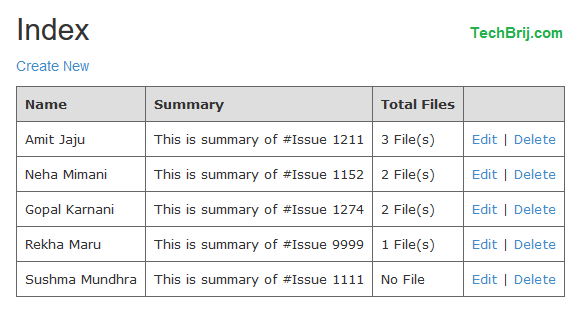
Index View:
14. To show list of support requests with edit and delete options, add following action
  public ActionResult Index()
        {
            return View(db.Supports.ToList());
        }
Add view of Index with following code:
@model IEnumerable<MultipleFileUpload.Models.Support>

@{
    ViewBag.Title = "Index";
}

<h2>Index</h2>

<p>
    @Html.ActionLink("Create New", "Create")
</p>
<table class="gridtable">
    <tr>
        <th>
            @Html.DisplayNameFor(model => model.Name)
        </th>
        <th>
            @Html.DisplayNameFor(model => model.Summary)
        </th>
         <th>Total Files</th>
        <th></th>
    </tr>

@foreach (var item in Model) {
    <tr>
        <td>
            @Html.DisplayFor(modelItem => item.Name)
        </td>
        <td>
            @Html.DisplayFor(modelItem => item.Summary)
        </td>
        <td>@if (item.FileDetails.Count() == 0) {
            <span>No File</span>
            }
            else{
            <span>@item.FileDetails.Count() File(s)</span>
            }
        </td>
        <td>
            @Html.ActionLink("Edit", "Edit", new { id=item.SupportId }) |
            <a href="javascript:void(0);" data-id="@item.SupportId" class="deleteItem">Delete</a>
        </td>
    </tr>
}

</table>
Delete Support Record:
To implement delete functionality of Support, add following script in Index.cshtml
 $('.deleteItem').click(function (e) {
            e.preventDefault();
            var $ctrl = $(this);
            if (confirm('Do you really want to delete this item?')) {
                $.ajax({
                    url: '@Url.Action("Delete")',
                    type: 'POST',
                    data: { id: $(this).data('id') }
                }).done(function (data) {
                    if (data.Result == "OK") {
                        $ctrl.closest('tr').remove();
                    }
                    else if (data.Result.Message) {
                        alert(data.Result.Message);
                    }
                }).fail(function () {
                    alert("There is something wrong. Please try again.");
                })

            }
        });
and add following action:
  [HttpPost]
        public JsonResult Delete(int id)
        {
            try
            {
                Support support = db.Supports.Find(id);
                if (support == null)
                {
                    Response.StatusCode = (int)HttpStatusCode.NotFound;
                    return Json(new { Result = "Error" });
                }

                //delete files from the file system

                foreach (var item in support.FileDetails){
                    String path = Path.Combine(Server.MapPath("~/App_Data/Upload/"), item.Id + item.Extension);
                    if (System.IO.File.Exists(path))
                    {
                        System.IO.File.Delete(path);
                    }
                }

                db.Supports.Remove(support);
                db.SaveChanges();
                return Json(new { Result = "OK" });
            }
            catch (Exception ex)
            {
                return Json(new { Result = "ERROR", Message = ex.Message });
            }
        }
In above method, First we delete all associated physical files on the server and then remove Support(parent entity) only. It will remove all related FileDetail (child entity) data means cascade delete is applied.
Source Code:
Summary:
In this tutorial, we saw how to implement CRUD operations with Multiple File Upload allowing same name, delete and download file functionality in ASP.NET MVC 5. If we talk about Entity Framework, we saw how to implement CRUD operations on Parent Child like table structure.
Enjoy .NET !!