In this tutorial, we will setup HTTPS with Apache on Ubuntu server and generate free SSL certificate from Let's Encrypt. It is a free certificate authority which can issue free certificates with a valid duration of 90 days and the certificates cost nothing to implement. It is assumed you know the basics and importance of HTTPS and SSL in terms of safety and security.
Read Also: Install or Upgrade to PHP 7.X on Ubuntu
Generate SSL Certificate
There are several ways to generate a Let’s Encrypt certificate.
via ZeroSSL:
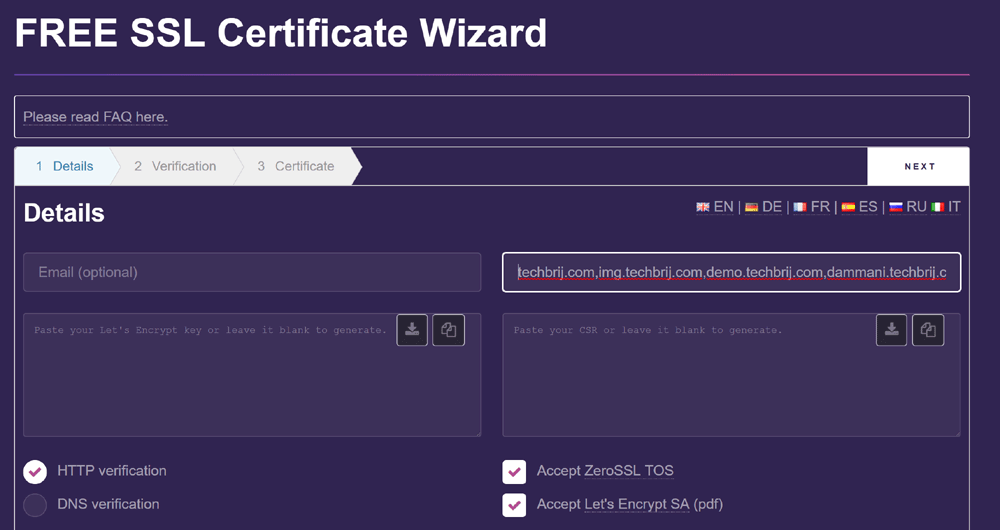
You can generate Let’s Encrypt certificate via ZeroSSL online tool. Click on Online Tools > Start button to get started.
In Details screen, you can enter email, domain name and accept the TOS. If you want to use the same certificate for multiple domains and subdomains. You can enter it as comma separated.

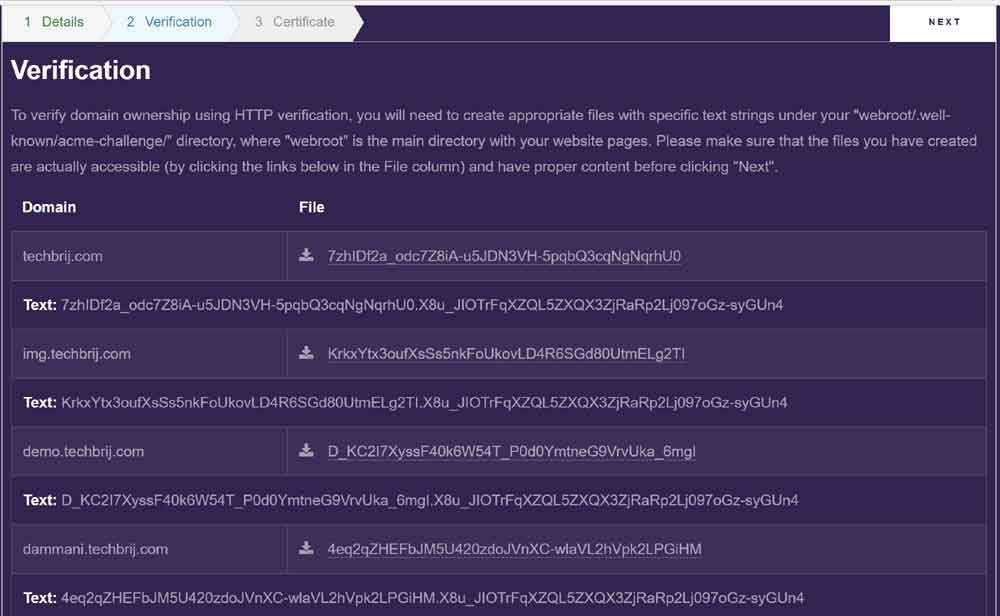
There are two approaches for verifications DNS or HTTP.
In DNS verification, you need to access your control panel and add a TXT record specified in Verification step in wizard. Once the record has been added, you’ll need to wait at least 5 minutes for propagating the changes.
In HTTP verification, you need to create appropriate files with specific text strings under a particular directory specified in verfication wizard.

You can select any option as per your convenience. On Next click CSR will be generated. you can copy and save it. After that, verification step comes. You need to do as per your verification criteria. If everything is working fine then It will generate your certificate and you can download both Domain certificate and Domain key.
The certificate file contains both your domain certificate and the issuer's certificate. Most modern web servers will accept them as is. But old version of Apache and some control panels want them separately. In that case just split the certificate file in two preserving BEGIN and END lines around both certificates. The first one is your domain certificate and the second one is the issuer's (Intermediate certificate, certificate chain or CA Bundle)
via Certbot:
You can setup the official client "CertBot" on your VPS server by running following commands:
sudo add-apt-repository ppa:certbot/certbot
sudo apt-get update
sudo apt-get install python-certbot-apache
Then generate certificate for a domain:
sudo certbot --apache -d mywebsite.comfor multiple domains and subdomains:
sudo certbot --apache -d mywebsite.com -d sub1.mywebsite.com -d sub2.mywebsite.comAfter that, you have to go through different steps to customize certificate options. When installation is finished, you will get the generated certificate files at /etc/letsencrypt/live.
As the certificate is for 90 days, Certbot will renew your certificates and reload Apache to pick up the changes. If the automated renewal process ever fails, Let’s Encrypt will send a message to the email you specified, warning you when your certificate is about to expire.
To test the renewal process, you can do a dry run with certbot:
sudo certbot renew --dry-runNote: The above process will install certificate on web-server. If you want to obtain only the certificates from Let's encrypt and setup manually on web-server, you can do so by running the following command instead of the above.
./certbot-auto --apache certonlyConfigure Apache
If you used ZeroSSL way, certbot manual approach (not automatic) or want to setup manually ignoring cPanel, zPanel (Sentora)...etc then the next step is to configure Apache for the certificates.
1. Activate SSL
a2enmod ssl2. Upgrade openssl
sudo apt-get update
sudo apt-get install --only-upgrade libssl1.0.0 openssl
3. To add protection from Poodle attack and man in the middle attacks
open ssl.conf file
nano /etc/apache2/mods-enabled/ssl.confSet following configuration
SSLProtocol ALL -SSLv2 -SSLv3
SSLCipherSuite ECDHE-RSA-AES128-SHA:ECDHE-RSA-AES256-SHA:HIGH:+AES256:+CAMELLIA:+SHA1:+3DES:!aNULL:!DSS:!DH:-AES+SSLv3
SSLHonorCipherOrder On
4. Restart apache
sudo service apache2 restartUpdate website virtual-host file configuration:
5. To redirect http to https, check following example:
<virtualhost *:80>
  RewriteEngine on
  ReWriteCond %{SERVER_PORT} !^443$
  RewriteRule ^/(.*) https://%{HTTP_HOST}/$1 [L,R=301,NE]
</virtualhost>
Here 301 permanent redirect is done for preserving SEO rankings of the link.
6. To setup SSL certificates(for Apache <=2.4.7):
<virtualhost *:443>
.
.
.
SSLEngine on
SSLCertificateFile /etc/letsencrypt/ssl/server.crt
SSLCertificateChainFile /etc/letsencrypt/ssl/chain.pem
SSLCertificateKeyFile /etc/letsencrypt/ssl/server.key
</virtualhost>
Update path with your location of certificates.
server.crt = domain certificate + Issuer certificate
chain.pem = Issuer certificate = Intermediate certificate = chain certificate
server.key = domain key file
Note: If you are missing chain.pem, you can get it from second certificate of .crt file OR from below link:
https://letsencrypt.org/certificates/
For newer Apache version, SSLCertificateChainFile is no longer needed.
Use Mozilla SSL Configuration Generator to generate Mozilla security recommended webserver configuration files for different webservers with different versions.
SSL Testing
You can verify the status of your SSL certificate with the following link (replace example.com with your base domain):
https://www.ssllabs.com/ssltest/analyze.html?d=example.com&latestIf you are getting "Chain issues - incomplete" then check for chain file. Make sure it is properly defined. If you are defining SSLCertificateChainFile then make sure it is just after SSLCertificateFile. Sometimes, the order of certificate definition matters and restart the server.
Conclusion
In this tutorial, we saw different ways to generate Let’s Encrypt free ssl certificates (via ZeroSSL and Certbot) and configured Apache to setup the certificates. Finally, SSL setup is done without any cost.
Enjoy HTTPS !!