This article will demonstrate how to perform CRUD (Create, Read, Update, Delete) operations using jTable jQuery plug-in and ASP.NET Web API 2 OData service.
Used Environment: VS 2013 Update 1, Entity Framework 6, ASP.NET Web API 2, jTable 2.4.0
Create OData Service:
I am going to use same OData service which I created in my previous tutorial (Steps 1-7). Here is quick view to create OData Service.
Create "Empty" ASP.NET project with "Web API" folders and core references and add a model "Person.cs"
	[Table("Person")]
    public class Person
    {

        public int ID { get; set; }

        [Required]
        [MaxLength(50)]
        public string Name { get; set; }

        [Required]
        [MaxLength(20)]
        public string Phone { get; set; }

        [Required]
        [MaxLength(50)]
        public string Email { get; set; }

    }
Add a controller with "Web API 2 OData Controller with actions, using Entity Framework", select Person class as Model and create new context.
Replace the code of WebApiConfig.cs with following to add the EDM and route.
public static class WebApiConfig
   {

       public static void Register(HttpConfiguration config)
       {
           ODataConventionModelBuilder builder = new ODataConventionModelBuilder();
           builder.EntitySet<Person>("Persons");
           config.Routes.MapODataRoute("odata", "odata", builder.GetEdmModel());
       }
   }
When you run it first time, the database is created. Add some data in database for testing and check service by opening following URL:
http://hostname/odata/Persons
Add A View as OData Client:
We will add a view to consume OData service in same app.
Solution Explorer > Right click on Controller folder > Add > Controller > Select “MVC 5 Controller -Empty” > add > name “HomeController” > Add
Open HomeController > Right click on Index method > Add View > Remove “Use a layout page” selection > Add
Add jTable:
To install jTable, run the following command in the Package Manager Console
Install-Package jTable
It will add jtable folder in Scripts folder.
Open View and Add following CSS references:
  <link href="~/Content/themes/base/jquery-ui.css" rel="stylesheet" />
  <link href="~/Scripts/jtable/themes/metro/blue/jtable.css" rel="stylesheet" />
Add following javascript references:
 <script src="~/Scripts/jquery-1.10.2.js"></script>
    <script src="~/Scripts/jquery-ui-1.9.2.min.js"></script>
    <script src="~/Scripts/jtable/jquery.jtable.js"></script>
In a better way, you can create bundle for css and js files and use it with @Styles.Render("~/Content/cssbundlename") @Scripts.Render("~/bundles/jsbundlename"). I kept in traditional way for quick understanding.
In html body tag:
<div style="max-width:600px;margin-top:15px">
        <div id="PersonContainer"></div>
</div>
To define action and fields of jTable:
     $(function () {

            $('#PersonContainer').jtable({
                title: 'Person Information',
                paging: true,
                pageSize: 10,
                sorting: true,
                multiSorting: true,
                defaultSorting: 'Name asc',
                actions: {
                    listAction: getListData,
                    deleteAction: deleteItem,
                    createAction: createItem,
                    updateAction: updateItem
                },
                fields: {
                    ID: {
                        key: true,
                        create: false,
                        edit: false,
                        list: false
                    },
                    Name: {
                        title: 'Name',
                        width: '30%'
                    },
                    Email: {
                        title: 'Email address',
                        width: '30%'
                    },
                    Phone: {
                        title: 'Phone',
                        width: '30%'
                    }
                }
            });
            $('#PersonContainer').jtable('load');
        });
I have not not covered validation to keep the app simple.
Read Operation:
To get data:
        function getListData(postData, jtParams) {

            var ret;
            var query = "/odata/Persons" //root uri
            + "?$select=ID,Name,Email,Phone" //reduce the payload to what we need
            + "&$inlinecount=allpages"
            + "&$orderby=" + jtParams.jtSorting.replace(' DESC', ' desc').replace(' ASC', ' asc')
            + "&$skip=" + jtParams.jtStartIndex
            + "&$top=" + jtParams.jtPageSize
            //+ "&$format=json" //give me json... will be used in newer OData
            //+ "&$callback=callback"; //this is my callback for future
            return $.Deferred(function ($dfd) {
                $.ajax({
                    url: query,
                    type: 'GET',
                    dataType: 'json',
                    data: postData,
                    success: function (data) {
                        ret = {
                            'Result': "OK",
                            'Records': data.value,
                            'TotalRecordCount': data['odata.count']
                        };
                        $dfd.resolve(ret);
                    },
                    error: function () {
                        $dfd.reject();
                    }
                });
            });

        }
Here OData service response data is converted into jTable plugin required format.
Create Operation:
To insert data, POST HTTP verb is used.
function createItem(postData) {
            var ret;
            return $.Deferred(function ($dfd) {
                $.ajax({
                    url: '/odata/Persons',
                    type: 'POST',
                    dataType: 'json',
                    data: postData,
                    success: function (data) {
                        ret = {
                            'Result': "OK",
                            'Record': data
                        };
                        $dfd.resolve(ret);
                    },
                    error: function () {
                        $dfd.reject();
                    }
                });
            });
        }
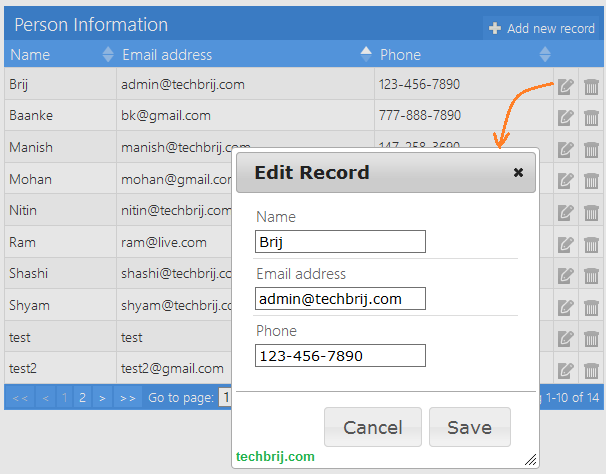
Update Operation:
To update data, PUT HTTP verb is used.
function updateItem(item) {
            var ret;
            return $.Deferred(function ($dfd) {
                $.ajax({
                    url: '/odata/Persons(' + getParameterByName(item, 'ID') + ')',
                    type: 'PUT',
                    dataType: 'json',
                    data: item,
                    success: function (data) {
                        ret = {
                            'Result': "OK",
                            'Record': data
                        };
                        $dfd.resolve(ret);
                    },
                    error: function () {
                        $dfd.reject();
                    }
                });
            });
        }

		  function getParameterByName(str, name) {
            var sURLVariables = str.split('&');
            for (var i = 0; i < sURLVariables.length; i++) {
                var sParameterName = sURLVariables[i].split('=');
                if (sParameterName[0] == name) {
                    return sParameterName[1];
                }
            }
        }
For update operation, We need url in '/odata/Persons(1)' format. To get id from item, getParameterByName method is used.
Delete Operation:
To delete data, Delete HTTP verb is used.
function deleteItem(item) {
            return $.Deferred(function ($dfd) {
                $.ajax({
                    url: '/odata/Persons(' + item.ID + ')',
                    type: 'DELETE',
                    dataType: 'json',
                    data: item,
                    success: function (data) {
                        $dfd.resolve({ 'Result': "OK" });
                    },
                    error: function () {
                        $dfd.reject();
                    }
                });
            });
        }
Conclusion:
We have created ASP.NET Web API OData service quickly and implemented CRUD operations with jTable jQuery plugin keeping default generated OData Controller code by Visual Studio.
Enjoy OData !!