This tutorial shows how to build a survey or voting app that displays poll results in real-time using ASP.NET SignalR, React.js and D3.js.
ASP.NET SignalR: to build the real time voting app, then broadcast the live result as votes come in.
D3.js: For data visualization. (Creating Pie chart to show the result)
React.js: To update UI in a very efficient manner for real time changes.
If you are new to React.js, I strongly recommend to read following tutorial:
React.js: Introduction and Hello World with ASP.NET MVC 5
Video:
Getting started:
Software versions used in the tutorial:
Visual Studio 2012
ASP.NET MVC 5.0
SignalR 2.0.1
React.js 0.12.2
ReactJS.NET 1.3
D3.js 3.5.3
Set up the Project:
1. Visual Studio 2013 > File > New Project > ASP.NET Web Application > OK (Call VotingApp)
2. Select MVC Template > Change Authentication = No Authentication > OK
3. In Solution Explorer, right-click the project, select Add | SignalR Hub Class (v2). Name the class VotingHub.cs and add it to the project. This step creates the VotingHub class and adds to the project a set of script files and assembly references that support SignalR.
4. In Solution Explorer, expand the Scripts node. Script libraries for jQuery and SignalR are visible in the project.
5. In Solution Explorer, right-click the project, then click Add | OWIN Startup Class. Name the new class Startup and click OK. Call MapSignalR method like below:
public void Configuration(IAppBuilder app)
        {
            // Any connection or hub wire up and configuration should go here
            app.MapSignalR();
        }
6. Install React.js by running following command in the Package Manager Console
Install-Package react.js
It will add react javascript files in Scripts folder.
7. Similarly Install ReactJS.NET to use React in ASP.NET MVC easily.
Install-Package React.Web.Mvc4
In this demo, we are using to convert JSX on the fly, but it is useful to pre-render the initial state of your React components server-side which speeds up initial page loads.
8. Install D3.js by running following command
Install-Package d3
Hub:
For demo purpose and simplicity, I am using static variable to hold current voting result. You can use any database for this.
9. Replace VotingHub class content with following:
     public class VotingHub : Hub
    {

        public static Dictionary<string, int> poll = new Dictionary<string, int>(){
             {"Apples",10 },
             {"Oranges",10},
             {"Bananas",10},
             {"Blueberries",10},
             {"mangoes",10},
        };


        public void Send(string name)
        {
            poll[name]++;
            string data = JsonConvert.SerializeObject(poll.Select(x => new { name = x.Key, count = x.Value }).ToList());


            Clients.All.showLiveResult(data);
        }
    }
Create Poll:
10. Add jsx folder in Scripts folder and add "form.jsx" file in it. Add the following content in it.
var RadioInput = React.createClass( {
    handleClick: function() {
        this.props.onChoiceSelect( this.props.choice );
    },
    render: function() {
        var disable = this.props.disable;
        var classString = !disable ?  "radio" :  "radio disabled";
        return (
            <div className={classString}>
                <label className={this.props.classType}>
                    <input type="radio" name="optionsRadios" id={this.props.index} value={this.props.choice} onChange={this.handleClick}  />
                    {this.props.choice}
                </label>
            </div>
        );
    }
} );


var QuizContainer = React.createClass( {
    getInitialState: function() {
        return {
            current_quiz: { question : '', choices:[] },
            user_choice: "",
			is_done: false
        };
    },
	componentDidMount: function() {
    $.ajax({
      url: this.props.url,
      dataType: 'json',
      success: function(data) {
        this.setState( {
            current_quiz: data,
            user_choice: "",
			is_done: false
        });
      }.bind(this),
      error: function(xhr, status, err) {
        console.error(this.props.url, status, err.toString());
      }.bind(this)
    });
   },
    selectedAnswer: function( option ) {
        this.setState( { user_choice: option } );
    },
    handleSubmit: function() {

				var selectedChoice = this.state.user_choice;
				 var vhub = $.connection.votingHub;
				  $.connection.hub.start().done(function () {
                    // Call the Send method on the hub.
                    vhub.server.send(selectedChoice);
                    // Clear text box and reset focus for next comment.
				});
				this.setState({ is_done: true });
        },
    render: function() {
        var self = this;

		if (this.state.is_done === true){
			return (
				<div className="quizContainer">
					<h1>Thank you for your vote. </h1>
				</div>
			);
		}
		else
		{
        var choices = this.state.current_quiz.choices.map( function( choice, index ) {
            return (
                <RadioInput key={choice.name} choice={choice.name} index={index} onChoiceSelect={self.selectedAnswer} />
            );
        } );
        var button_name = "Submit";
        return(
            <div className="quizContainer">
                <h1>Quiz</h1>
                <p>{this.state.current_quiz.question}</p>
                {choices}
                <button id="submit" className="btn btn-default" onClick={this.handleSubmit}>{button_name}</button>
            </div>
        );
		}
    }
} );

React.render(
    <QuizContainer url="/home/surveyquiz" />,
    document.getElementById('container')
);
RadioInput: component for radio button
QuizContainer: component which get data from the url and draws question, options and submit button.
It needs data in following format:
{
    "question": "Which is your favourite fruit?",
    "choices": [
        {
            "name": "Apples",
            "count": 10
        },
        {
            "name": "Oranges",
            "count": 10
        },
        {
            "name": "Bananas",
            "count": 10
        },
        {
            "name": "Blueberries",
            "count": 10
        },
        {
            "name": "mangoes",
            "count": 10
        }
    ]
}
11. Open HomeController and add following to return data in the above format:
        public JsonResult SurveyQuiz()
        {
            var poll = new
            {
                question = "Which is your favourite fruit?",
                choices = VotingHub.poll.Select(x => new { name = x.Key, count = x.Value }).ToList()
            };
            return Json(poll, JsonRequestBehavior.AllowGet);
        }
12. Open View of Index method and replace with following:
@{
    ViewBag.Title = "Poll";
}
<div id="container">

</div>

@section scripts {
    <!--Script references. -->
    <!--The jQuery library is required and is referenced by default in _Layout.cshtml. -->
    <!--Reference the SignalR library. -->
    <script src="~/Scripts/jquery.signalR-2.0.1.min.js"></script>

    <!--Reference the autogenerated SignalR hub script. -->
    <script src="~/signalr/hubs"></script>
    <script src="~/Scripts/react/react-0.12.2.min.js"></script>
    <script src="~/Scripts/jsx/form.jsx"></script>
}
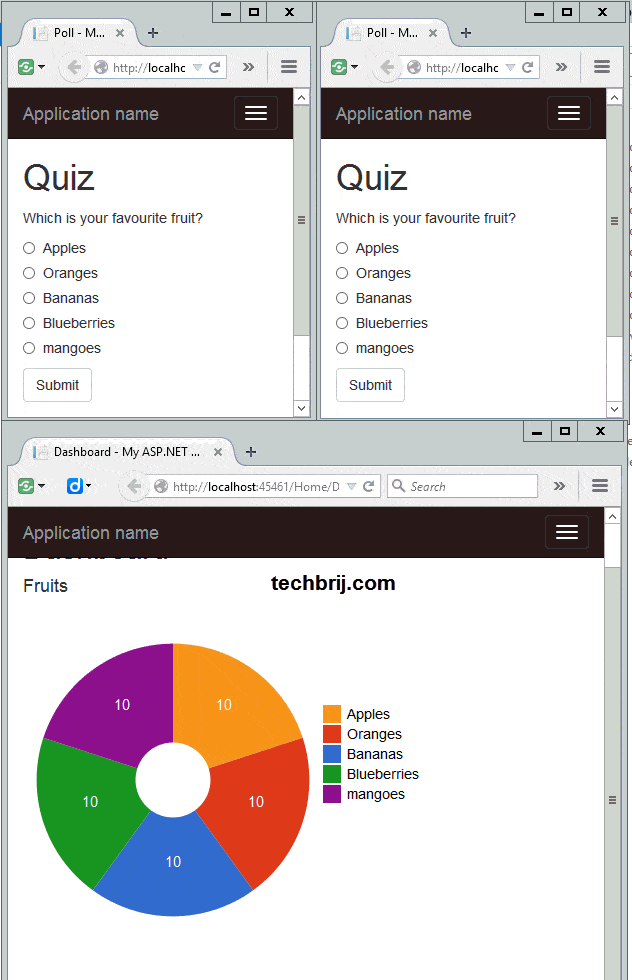
Run the app, you will get question form. Select any option and hit submit, you will get Thank you message.
Live Result:
13. Add new file "piechart.jsx" in Scripts\jsx folder and add following content:
var colors = ['#FD9827', '#DA3B21', '#3669C9', '#1D9524', '#971497'];
var D3Legend = React.createClass({

  propTypes: {
    width: React.PropTypes.number,
    height: React.PropTypes.number,
    colors: React.PropTypes.array.isRequired,
    data: React.PropTypes.array.isRequired,
  },

  render: function() {
    var color = this.props.colors;
    var data = this.props.data;
    var elements = data.map(function(item, i){
      return (
        <LegendElement color={color} xpos="0" ypos={100+i*20} data={item.name} key={i} ikey={i}/>
      )
    })

    return(
        <svg className="legend" width={this.props.width} height={this.props.height}>{elements}</svg>
    );
  }
});


var LegendElement = React.createClass({
  render: function() {
    var position =  "translate(" + this.props.xpos + "," + this.props.ypos + ")";
    return (
      <g transform={position}>
        <rect width="18" height="18" fill={this.props.color[this.props.ikey]}></rect>
        <text x="24" y="9" dy=".35em">{this.props.data}</text>
      </g>
    );
  }
});

var Sector = React.createClass({
  getInitialState: function() {
    return {text: '', opacity:'arc'};
  },
  render: function() {
    var outerRadius = this.props.width/2.2;
    var innerRadius = this.props.width/8;
    var arc = d3.svg.arc()
        .outerRadius(outerRadius)
        .innerRadius(innerRadius);
    var data = this.props.data;
    var center = "translate(" + arc.centroid(data) + ")";
    var percentCenter = "translate(0,3)";
    var color = this.props.colors;
    return (
      <g onMouseOver={this.onMouseOver} onMouseOut={this.onMouseOut} onClick={this.onClick}>
        <path className={this.state.opacity} fill={colors[this.props.ikey]} d={arc(this.props.data)}></path>
        <text fill="white" transform={center} textAnchor="middle" fontSize="15px">{data.value}</text>
        <text fill={colors[this.props.ikey]} stroke={color} fontSize="15px" transform={percentCenter} textAnchor="middle">{this.state.text}</text>
      </g>
    );
  },

  onMouseOver: function() {
    this.setState({text: '', opacity:'arc-hover'});
    var percent = (this.props.data.value/this.props.total)*100;
    percent = percent.toFixed(1);
    this.setState({text: percent + " %"});
  },
  onMouseOut: function() {
    this.setState({text: '', opacity:'arc'});
  },
  onClick: function() {
    alert("You clicked "+this.props.name);
  }
});

var DataSeries = React.createClass({
  propTypes: {
    width: React.PropTypes.number.isRequired,
    height: React.PropTypes.number.isRequired,
    color: React.PropTypes.array,
    data: React.PropTypes.array.isRequired,
  },
  render: function() {
    var color = this.props.colors;
    var data = this.props.data;
    var width = this.props.width;
    var height = this.props.height;
    var pie = d3.layout.pie();
    var result = data.map(function(item){
      return item.count;
    })
    var names = data.map(function(item){
      return item.name;
    })
    var sum = result.reduce(function(memo, num){ return memo + num; }, 0);
    var position = "translate(" + (width)/2 + "," + (height)/2 + ")";
    var bars = (pie(result)).map(function(point, i) {
      return (
        <Sector data={point} ikey={i} key={i} name={names[i]} colors={color} total=
        {sum} width={width} height={height}/>
      )
    });

    return (
        <g transform={position}>{bars}</g>
    );
  }
});

var D3Chart = React.createClass({
  propTypes: {
    width: React.PropTypes.number.isRequired,
    height: React.PropTypes.number.isRequired,
    children: React.PropTypes.node,
  },
  render: function() {
    return (
      <svg width={this.props.width} height={this.props.height}>
      {this.props.children}</svg>
    );
  }
});

var D3PieChart = React.createClass({
  propTypes: {
    width: React.PropTypes.number,
    height: React.PropTypes.number,
    title: React.PropTypes.string,
    data: React.PropTypes.array.isRequired,
  },

  getDefaultProps: function() {
    return {
      width: 300,
      height: 350,
      title: '',
      Legend: true,
    };
  },

  render: function() {

    return (
      <div>
        <h4> {this.props.title} </h4>
        <D3Chart width={this.props.width} height={this.props.height}>
              <DataSeries data={this.props.data} colors={colors} width=
                {this.props.width} height={this.props.height}/>
        </D3Chart>
        <D3Legend data={this.props.data} colors={colors} width={this.props.width - 100} height={this.props.height} />
      </div>
    );
  }
});
Basically we created pie chart component using React.js and D3.js based on this post.
14. Add new file "dashboard.jsx" in Scripts\jsx folder and add following content:
var dataInit = [
];

var DashboardApp = React.createClass({

	getInitialState: function () {
		return {data: dataInit};
	},

	componentDidMount: function () {
			var self =this;

			  $.ajax({
					 url: this.props.url,
					 dataType: 'json',
					 success: function(data2) {
						  this.setState({data:data2.choices});
					}.bind(this),
					error: function(xhr, status, err) {
						  console.error(this.props.url, status, err.toString());
					}.bind(this)
			 });


			//SignalR Code
			var vhub = $.connection.votingHub;

            vhub.client.showLiveResult = function (data) {
				var obj = $.parseJSON(data);
				self.setState({data: obj});
            };

			$.connection.hub.start();


	},

	render: function() {
		return (
            <div className="dashboardapp">
				<D3PieChart data={this.state.data} title="Fruits"/>
            </div>
        );
	}

});


React.render(<DashboardApp  url="/home/surveyquiz"  />, document.getElementById('chartResult'));
15. Open HomeController and add following action for result,
 public ActionResult Dashboard()
        {
            return View();
        }
16. Right click on the action and Add view with the following content
@{
    ViewBag.Title = "Dashboard";
}

<h2>Dashboard</h2>

<section id="chartResult"></section>

@section scripts {
    <!--Script references. -->
    <!--The jQuery library is required and is referenced by default in _Layout.cshtml. -->
    <!--Reference the SignalR library. -->
    <script src="~/Scripts/jquery.signalR-2.0.1.min.js"></script>
    <!--Reference the autogenerated SignalR hub script. -->
    <script src="~/signalr/hubs"></script>

    <script src="~/Scripts/d3/d3.min.js"></script>
    <script src="~/Scripts/react/react-0.12.2.min.js"></script>

    <script src="~/Scripts/jsx/piechart.jsx"></script>
    <script src="~/Scripts/jsx/dashboard.jsx"></script>

}
Now run the application and on dashboard page you will get all options with default count.
Output:
Source Code:
Conclusion:
In this tutorial, we implemented real-time voting app with SignalR, created form and result chart with React.js. This is just example how to take advantage of React.js performance realtime. Hope you like it.
Enjoy React.js !!