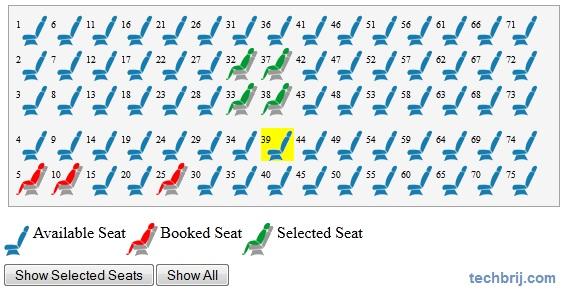
In my Online Bus Reservation System project, I got queries from many people about how to implement seat selection screen effectively. So, I decided to write on it. This post explains how to implement seat booking with jQuery. It can be used in online Bus, flight, hotel, exam support, cinema and ticket booking system.

HTML:
<h2> Choose seats by clicking the corresponding seat in the layout below:</h2>
    <div id="holder">
		<ul  id="place">
        </ul>
	</div>
	<div style="float:left;">
	<ul id="seatDescription">
		<li style="background:url('images/available_seat_img.gif') no-repeat scroll 0 0 transparent;">Available Seat</li>
		<li style="background:url('images/booked_seat_img.gif') no-repeat scroll 0 0 transparent;">Booked Seat</li>
		<li style="background:url('images/selected_seat_img.gif') no-repeat scroll 0 0 transparent;">Selected Seat</li>
	</ul>
	</div>
        <div style="clear:both;width:100%">
		<input type="button" id="btnShowNew" value="Show Selected Seats" />
		<input type="button" id="btnShow" value="Show All" />
        </div>
We will add seats in "#place" element using javascript.
Settings:
To make it generalize, settings object is used.
 var settings = {
                rows: 5,
                cols: 15,
                rowCssPrefix: 'row-',
                colCssPrefix: 'col-',
                seatWidth: 35,
                seatHeight: 35,
                seatCss: 'seat',
                selectedSeatCss: 'selectedSeat',
				selectingSeatCss: 'selectingSeat'
            };
rows: total number of rows of seats.
cols: total number of seats in each row.
rowCssPrefix: will be used to customize row layout using (rowCssPrefix + row number) css class.
colCssPrefix: will be used to customize column using (colCssPrefix + column number) css class.
seatWidth: width of seat.
seatHeight: height of seat.
seatCss: css class of seat.
selectedSeatCss: css class of already booked seats.
selectingSeatCss: css class of selected seats.
Seat Layout:
We will create basic layout of seats.
var init = function (reservedSeat) {
                var str = [], seatNo, className;
                for (i = 0; i < settings.rows; i++) {
                    for (j = 0; j < settings.cols; j++) {
                        seatNo = (i + j * settings.rows + 1);
                        className = settings.seatCss + ' ' + settings.rowCssPrefix + i.toString() + ' ' + settings.colCssPrefix + j.toString();
                        if ($.isArray(reservedSeat) && $.inArray(seatNo, reservedSeat) != -1) {
                            className += ' ' + settings.selectedSeatCss;
                        }
                        str.push('<li class="' + className + '"' +
                                  'style="top:' + (i * settings.seatHeight).toString() + 'px;left:' + (j * settings.seatWidth).toString() + 'px">' +
                                  '<a title="' + seatNo + '">' + seatNo + '</a>' +
                                  '</li>');
                    }
                }
                $('#place').html(str.join(''));
            };
			//case I: Show from starting
            //init();

            //Case II: If already booked
            var bookedSeats = [5, 10, 25];
            init(bookedSeats);
init method is used to draw seats layout. Already booked seats array will be passed as argument of this method.
Seat Selection:
$('.' + settings.seatCss).click(function () {
if ($(this).hasClass(settings.selectedSeatCss)){
	alert('This seat is already reserved');
}
else{
	$(this).toggleClass(settings.selectingSeatCss);
	}
});

$('#btnShow').click(function () {
	var str = [];
	$.each($('#place li.' + settings.selectedSeatCss + ' a, #place li.'+ settings.selectingSeatCss + ' a'), function (index, value) {
		str.push($(this).attr('title'));
	});
	alert(str.join(','));
})

$('#btnShowNew').click(function () {
	var str = [], item;
	$.each($('#place li.' + settings.selectingSeatCss + ' a'), function (index, value) {
		item = $(this).attr('title');
		str.push(item);
	});
	alert(str.join(','));
})
When user clicks on available seat, it is selected and second click on same seat will unselect seat. Button "Show All" will show all booked seat numbers and "Show Selected Seats" will show selected seats only.
CSS:
#holder{
height:200px;
width:550px;
background-color:#F5F5F5;
border:1px solid #A4A4A4;
margin-left:10px;
}
#place {
position:relative;
margin:7px;
}
#place a{
font-size:0.6em;
}
#place li
{
 list-style: none outside none;
 position: absolute;
}
#place li:hover
{
background-color:yellow;
}
#place .seat{
background:url("images/available_seat_img.gif") no-repeat scroll 0 0 transparent;
height:33px;
width:33px;
display:block;
}
#place .selectedSeat
{
background-image:url("images/booked_seat_img.gif");
}
#place .selectingSeat
{
background-image:url("images/selected_seat_img.gif");
}
#place .row-3, #place .row-4{
margin-top:10px;
}
#seatDescription li{
verticle-align:middle;
list-style: none outside none;
padding-left:35px;
height:35px;
float:left;
}
In my next post, you will get how to use this in asp.net project with sql server database .
If you have any query, put in below comment box.