Few days back, I decided to setup development environment for deep learning on my Windows 10 laptop. In this article, I would share my experience in setting up a system typically for Data Science developers. Although I used Windows 10 but the steps will be same for Linux and Mac OS.
Being a developer, need IDE for coding and not fan of browser based editor. Jupyter Notebook is favourite tool for data scientist and we can't skip that in case of data science. Fortunately, VS Code supports Jupyter notebook. You can now directly edit .ipynb files and get the interactivity of Jupyter notebooks with all of the power of VS Code. We will go through it.
In this tutorial, we will cover the following steps:
1. Install Python
2. Install TensorFlow 2.0
3. Install Jupyter Notebook
4. Setup VS Code
5. Testing Environment
6. Virtual Environment (Optional)
1. Install Python
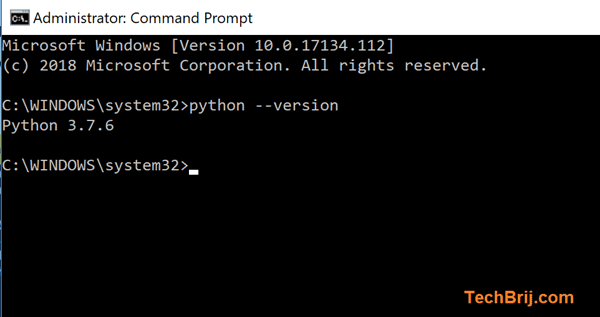
Download Python 3.7.6 from www.python.org(Currently, Tensorflow doesn't support Python 3.8). I would suggest to install it with "customize installation" option and allow all users.
After installation, check the Python version on terminal. If there are multiple versions of python installed in the machine then change PATH in environment variable to the installed version and restart terminal to check version.
2. Install TensorFlow 2.0
TensorFlow is open source deep learning framework by Google, helps us to build and design Deep Learning models.
For simplicity, we will install CPU version of TensorFlow.
python -m pip install --upgrade pip
pip install tensorflow
It will install all supportive extensions like numpy ...etc.
Note: Install the GPU version of TensorFlow only if you have an Nvidia GPU. It is good and recommended for better performance. It needs to Install/Update nvidia driver, cuda toolkit, cuDNN and then run following command to install
pip install tensorflow-gpu
For more information, check out the official guide here.
The next is to install Matplotlib- a Python library for 2D plotting and can work together with NumPy.
pip install matplotlib
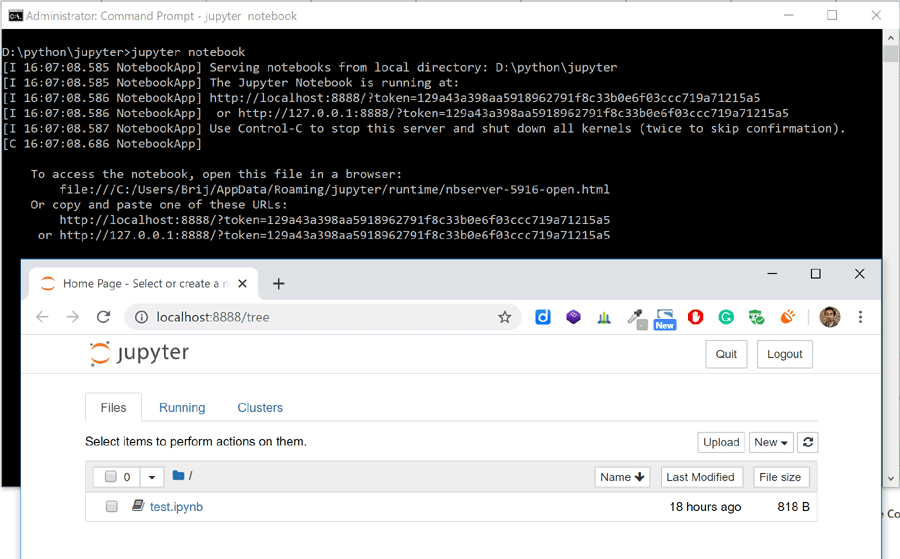
3. Install Jupyter Notebook
Jupyter Notebook is web based interactive environment for writing the code, creating & sharing files and doing visualizations as well.
run following command to install it:
pip install jupyter
Start the notebook server from the command line:
jupyter notebook
You should see the notebook open in your browser.
If you want to specify port:
jupyter notebook --port 9999
4. Setup VS Code
Download and install VS Code if not already installed.
Install the following VS Code extension from the marketplace.
https://marketplace.visualstudio.com/items?itemName=ms-python.python
Note: Make sure you have installed the latest version of the extension.
First time, open the VS Code Command Palette with the shortcut CTRL + SHIFT + P (Windows) or Command + SHIFT + P (macOS) in VSCode and select "Python: Select Interpreter" command. It will display all installed versions. Select the appropriate python environment where Jupyter notebook is installed.
To create new Jupyter notebook, open VS Code Command Palette again and run the “Python: Create Blank New Jupyter Notebook” command.
Why VS Code?
- You can manage source control, open multiple files, and leverage productivity features like IntelliSense, Git integration, and multi-file management, offering a brand-new way for data scientists and developers to experiment and work with data efficiently.
- Variable Explorer will help you keep track of the current state of your notebook variables at a glance, in real-time.
- You can export as Python code and do debugging and other operation like do in regular python application
5. Testing Environment
Now, it is time to test the environment.
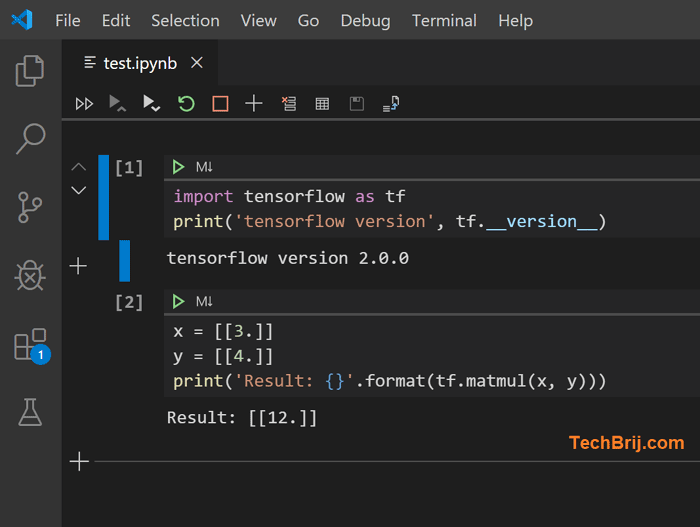
Create a new Jupyter book in VS Code and run following code to test :
import tensorflow as tf
print('tensorflow version', tf.__version__)

x = [[3.]]
y = [[4.]]
print('Result: {}'.format(tf.matmul(x, y)))
The output should be following:
tensorflow version 2.0.0
Result: [[12.]]
6. Virtual Environment (Optional)
a) As we are going to use same environment for all so installed TensorFlow, Jupyter Notebook in global Python environment. If you want to create a separate environment for this, you can create a virtual environment by running following command:
# macOS/Linux
# You may need to run sudo apt-get install python3-venv first
python3 -m venv /path/to/new/virtual/environment

# Windows
# You can also use py -3 -m venv c:\path\to\.venv
python -m venv c:\path\to\.venv
It will create .venv directory at specified path.
b) To activate python virutal environment
# Windows
c:\path\to\.venv\Scripts\activate.bat

or

cd c:\path\to\.venv\Scripts
activate
In VS Code:
In Command Palette CTRL + SHIFT + P, Run "Python: Create Terminal". It will open and activate the terminal in selected Python environment.
c) Now install the TensorFlow, Jupyter notebook ...etc in the activated environment.
Conclusion
In this tutorial, we saw
- how to set up a Python Deep Learning development environment using TensorFlow 2.0, Jupyter Notebook and VS Code.
- how Python extension in VS Code empowers notebook development in developer way.
If you face any problems, then feel free to share them in the comment section.
Enjoy Deep Learning !!