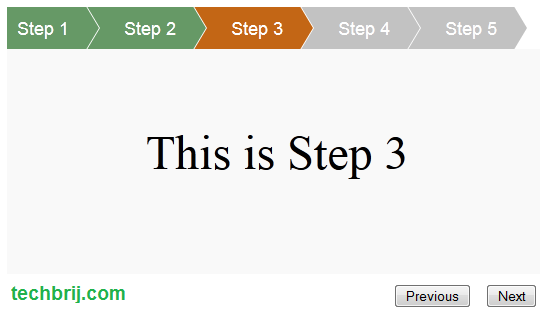
Our objective is to customize asp.net wizard control sidebar as stylish horizontal step navigation on top without any image. First, we will disable existing side bar and use header template to create own sidebar. See following screen-shot which we are going to implement:
Wizard Structure:
To disable existing sidebar, set DisplaySideBar="false". See following wizard structure, there are 5 steps for sample and Repeater is used in header template.
 <asp:Wizard ID="Wizard1" runat="server" DisplaySideBar="false">
            <WizardSteps>
                <asp:WizardStep ID="WizardStep1" runat="server" Title="Step 1">
                 <div class="content">This is Step 1</div>
                </asp:WizardStep>
                <asp:WizardStep ID="WizardStep2" runat="server" Title="Step 2">
                    <div class="content">This is Step 2</div>
                </asp:WizardStep>
                <asp:WizardStep ID="WizardStep3" runat="server" Title="Step 3">
                   <div class="content">This is Step 3</div>
                </asp:WizardStep>
                <asp:WizardStep ID="WizardStep4" runat="server" Title="Step 4">
                    <div class="content">This is Step 4</div>
                </asp:WizardStep>
            <asp:WizardStep ID="WizardStep5" runat="server" Title="Step 5">
                    <div class="content">This is Step 5</div>
                </asp:WizardStep>
           </WizardSteps>
            <HeaderTemplate>
                <ul id="wizHeader">
                    <asp:Repeater ID="SideBarList" runat="server">
                        <ItemTemplate>
                            <li><a class="<%# GetClassForWizardStep(Container.DataItem) %>" title="<%#Eval("Name")%>">
                                <%# Eval("Name")%></a> </li>
                        </ItemTemplate>
                    </asp:Repeater>
                </ul>
            </HeaderTemplate>
        </asp:Wizard>
See following server side code to bind repeater and assign class name:
	protected void Page_Load(object sender, EventArgs e)
    {
        Wizard1.PreRender += new EventHandler(Wizard1_PreRender);
    }
    protected void Wizard1_PreRender(object sender, EventArgs e)
    {
        Repeater SideBarList = Wizard1.FindControl("HeaderContainer").FindControl("SideBarList") as Repeater;
        SideBarList.DataSource = Wizard1.WizardSteps;
        SideBarList.DataBind();

    }

    protected string GetClassForWizardStep(object wizardStep)
    {
        WizardStep step = wizardStep as WizardStep;

        if (step == null)
        {
            return "";
        }
        int stepIndex = Wizard1.WizardSteps.IndexOf(step);

        if (stepIndex < Wizard1.ActiveStepIndex)
        {
            return "prevStep";
        }
        else if (stepIndex > Wizard1.ActiveStepIndex)
        {
            return "nextStep";
        }
        else
        {
            return "currentStep";
        }
    }
CSS:
There are 3 classes used for previous steps(prevStep), current step(currentStep) and next steps(nextStep).
		#wizHeader li .prevStep
        {
            background-color: #669966;
        }
        #wizHeader li .prevStep:after
        {
            border-left-color:#669966 !important;
        }
        #wizHeader li .currentStep
        {
            background-color: #C36615;
        }
        #wizHeader li .currentStep:after
        {
            border-left-color: #C36615 !important;
        }
        #wizHeader li .nextStep
        {
            background-color:#C2C2C2;
        }
        #wizHeader li .nextStep:after
        {
            border-left-color:#C2C2C2 !important;
        }
        #wizHeader
        {
            list-style: none;
            overflow: hidden;
            font: 18px Helvetica, Arial, Sans-Serif;
            margin: 0px;
            padding: 0px;
        }
        #wizHeader li
        {
            float: left;
        }
        #wizHeader li a
        {
            color: white;
            text-decoration: none;
            padding: 10px 0 10px 55px;
            background: brown; /* fallback color */
            background: hsla(34,85%,35%,1);
            position: relative;
            display: block;
            float: left;
        }
        #wizHeader li a:after
        {
            content: " ";
            display: block;
            width: 0;
            height: 0;
            border-top: 50px solid transparent; /* Go big on the size, and let overflow hide */
            border-bottom: 50px solid transparent;
            border-left: 30px solid hsla(34,85%,35%,1);
            position: absolute;
            top: 50%;
            margin-top: -50px;
            left: 100%;
            z-index: 2;
        }
        #wizHeader li a:before
        {
            content: " ";
            display: block;
            width: 0;
            height: 0;
            border-top: 50px solid transparent;
            border-bottom: 50px solid transparent;
            border-left: 30px solid white;
            position: absolute;
            top: 50%;
            margin-top: -50px;
            margin-left: 1px;
            left: 100%;
            z-index: 1;
        }
        #wizHeader li:first-child a
        {
            padding-left: 10px;
        }
        #wizHeader li:last-child
        {
            padding-right: 50px;
        }
        #wizHeader li a:hover
        {
            background: #FE9400;
        }
        #wizHeader li a:hover:after
        {
            border-left-color: #FE9400 !important;
        }
        .content
        {
            height:150px;
            padding-top:75px;
            text-align:center;
            background-color:#F9F9F9;
            font-size:48px;
        }
Note:
For browsers that don't support :after/:before/ nth-child, the code will not work.
Fun with CSS:
1. Increase margin-left in "#wizHeader li a:before" to increase width of arrow.
2. Add Padding:20px in "#wizHeader li" css you will get following layout
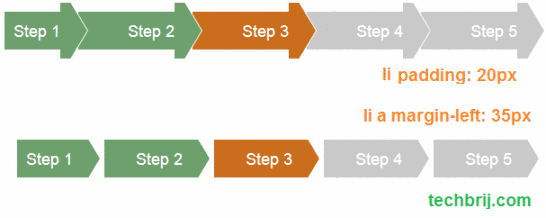
3. Set margin-left: 35px; in "#wizHeader li a" to get above layout.
Thanks this post, fiddle and CSS Triangle Breadcrumbs. Share your opinion or queries in comment box.
Enjoy Programming!!!