Visual Studio Code (VSCode) is a lightweight, open-source code editor and available on Linux, Mac OSX, and Windows. One of the key features of Visual Studio Code is its great debugging support for Node.js (JavaScript and TypeScript) and another feature is to run Tasks(Grunt, Gulp, MSBuild...etc.) from the IDE. If you are new to VSCode, I would recommend to see following video which shows how to debug Node.js app, put break-point and use watch window, use environment variable in Visual Studio Code editor:
Used software/tools for this article:
Windows 10
Node 4.4.0
Visual Studio Code 0.10.11 Beta
Debugging:
Here is the content of the above video:
Go to project directory in command prompt and use following command to open VSCode
code .
Create a new file app.js and use following code
var msg= "Hello World";
console.log(msg);
Setup Launch configuration:
Click Debug icon > Configure gear icon on the Debug view top bar > Select debug environment: Node.
It will generate a launch.json
{
"version": "0.2.0",
"configurations": [
{
"name": "Launch",
"type": "node",
"request": "launch",
"program": "${workspaceRoot}/app.js",
"stopOnEntry": false,
"args": [],
"cwd": "${workspaceRoot}",
"preLaunchTask": null,
"runtimeExecutable": null,
"runtimeArgs": [
"--nolazy"
],
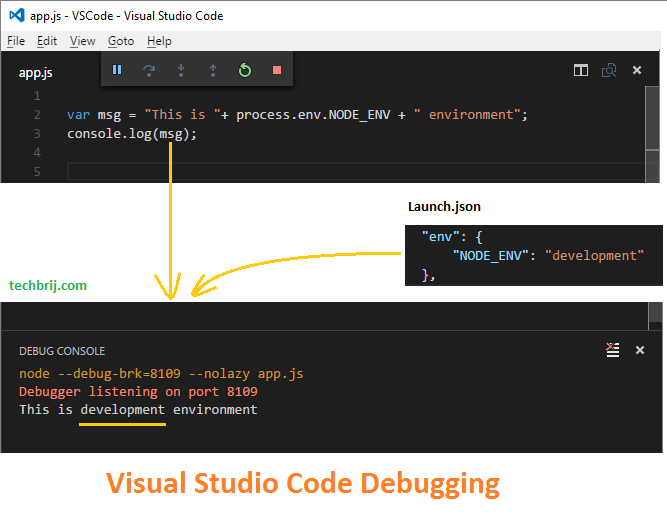
"env": {
"NODE_ENV": "development"
},
"externalConsole": false,
"sourceMaps": false,
"outDir": null
},
{
"name": "Attach",
"type": "node",
"request": "attach",
"port": 5858,
"address": "localhost",
"restart": false,
"sourceMaps": false,
"outDir": null,
"localRoot": "${workspaceRoot}",
"remoteRoot": null
}
]
}
in the Debug view > Select "Launch" in dropdown > F5 or click green arrow to start debug session.
You will get "Hello World" output in debug console.
You can put break-point and evaluate expression in watch window.
For more information related to debugging, see official notes.
Let's update code to use environment variable:
var msg = "This is "+ process.env.NODE_ENV + " environment";
console.log(msg);
Now you will get the following result:
Tasks:
Let's come on the main point of this post. Before we get started, it is important to understand how Tasks are executed in VSCode. Let's take Gulp task as an example. Here is the complete Video.
1. Goto project directory and install gulp package. It is recommended to install globally and use package.json file but for simplicity, to understand VSCode, we install it locally. Run following command to install gulp package.
npm install gulp
2. Open VSCode, create gulpfile.js and use following code
var gulp = require('gulp');
gulp.task('hello',function(){
    console.log('Hello World');
});
3. Press F1 to open the Command Palette > type "Configure Task Runner" > Enter to select
This will create a sample "tasks.json" file in the .vscode folder. The initial file has a large number of examples within it. Use following for Gulp hello task
{
	"version": "0.1.0",
	"command": "gulp",
	"isShellCommand": true,
	"tasks": [
		{
			"taskName": "hello",
			// Make this the default build command.
			"isBuildCommand": true,
			// Show the output window only if unrecognized errors occur.
			"showOutput": "always"

		}
	]
}
4. As this is the only task in the file, you can execute it by simply pressing Ctrl+Shift+B (Run Build Task). You will get Hello World in the output window.
5. Add one more task in gulpfile.js which uses environment variable:
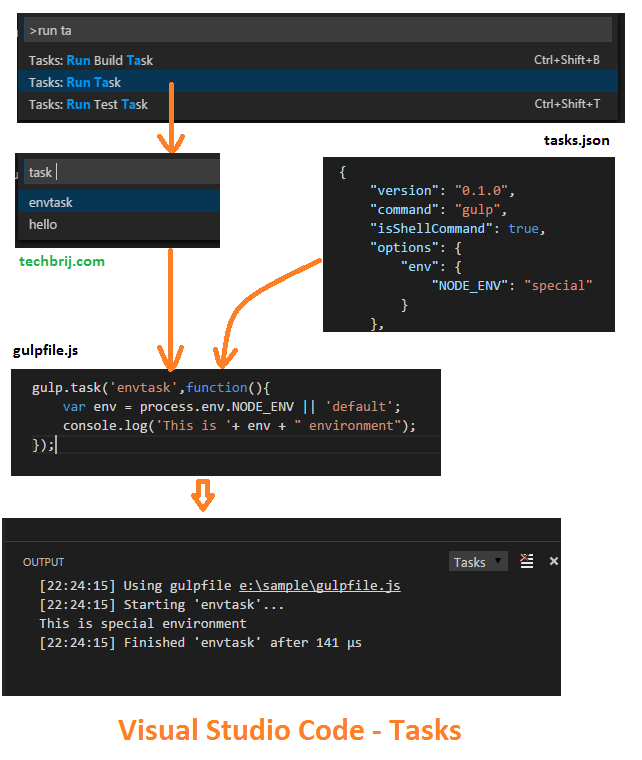
gulp.task('envtask',function(){
    var env = process.env.NODE_ENV || 'default';
    console.log('This is '+ env + " environment");
});
6. Add one more task in task.json in tasks array
		{
			"taskName": "envtask",
			// Make this the default build command.
			"isBuildCommand": true,
			// Show the output window only if unrecognized errors occur.
			"showOutput": "always"

		}
7. F1 > Run Task > Select envtask > Enter.
You will get following result
This is default environment.
8. tasks.json allows to set environment variable, it is in options. Here is the complete view of tasks.json:
{
	"version": "0.1.0",
	"command": "gulp",
	"isShellCommand": true,
    "options": {
        "env": {
            "NODE_ENV": "special"
        }
    },
	"tasks": [
		{
			"taskName": "hello",
			// Make this the default build command.
			"isBuildCommand": true,
			// Show the output window only if unrecognized errors occur.
			"showOutput": "always"

		},
        {
			"taskName": "envtask",
			// Make this the default build command.
			"isBuildCommand": true,
			// Show the output window only if unrecognized errors occur.
			"showOutput": "always"

		}
	]
}
9. F1 > Run Task > Select envtask > Enter.
You will get following result
This is special environment.
Conclusion:
We have seen how VSCode's built-in debugger helps accelerate edit, compile and debug loop and how to run Gulp tasks and pass environment variable in it. Both are the important features of VSCode. If you are .NET guy or Visual Studio fan, definitely you will like VSCode for front-end development especially on non-Windows platform. Enjoy VSCode !!