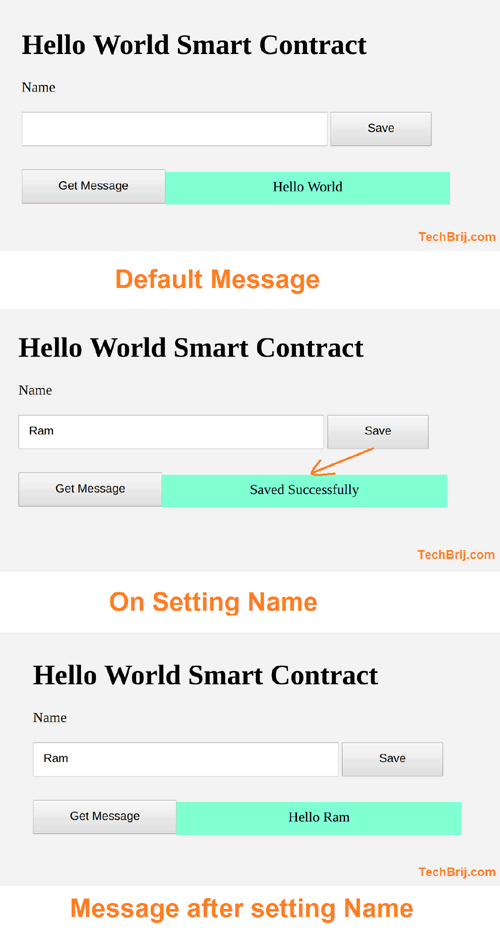
In Part-3, we created unit test methods for smart contract. Now, we will create a simple webpage to interact with the smart contract. The goal is to create a page with a textbox to enter name, buttons to save name and to get message.
Setup Express
1. We are going to use Node.js Express server for the front-end application. Go to project path in the terminal and run following commands:
npm init
npm install express --save
2. Also, install dotenv package for the environment variables
npm install dotenv --save
Add .env file in project root with following content
PORT=3000
MODE="development"
LOCAL_NODE="http://localhost:7545"
Here LOCAL_NODE is URL of local private blockchain.
3. Create server and client folders in the project. Create a main.js file in server folder with following code
require('dotenv').config();
const express = require('express');
const app = express();
const PORT = process.env.PORT || 3000;

app.use(express.static('client'));
app.use(express.static('build/contracts'));
app.get('/', (req, res) => {
    res.sendFile(`${__dirname}/client/index.html`);
  });

  app.get('*', (req, res) => {
    res.status(404);
    res.send('Ooops... this URL does not exist');
  });

  app.listen(PORT, () => {
    console.log(`TechBrij Ethereum HelloWorld App running on port ${PORT}...`);
  });
4. Add index.html in client folder
<!DOCTYPE html>
<html lang="en">
<head>
 <meta charset="UTF-8">
 <meta name="viewport" content="width=device-width, initial-scale=1.0">
 <meta http-equiv="X-UA-Compatible" content="ie=edge">
 <title>Hello World Smart Contract By TechBrij.com</title>
<link rel="stylesheet" type="text/css" href="index.css">
</head>
<body>
 <div class="container">
<h1>Hello World Smart Contract</h1>
<div>
<label for="name" class="col-lg-2 control-label">Name</label>
 <input id="name" type="text"/>
<button id="buttonSave">Save</button>
</div>
<button id="buttonMessage">Get Message</button>

<div id="output"></div>
<div id="errorHolder"></div>

</div>
<script src="https://ajax.googleapis.com/ajax/libs/jquery/1.12.4/jquery.min.js"></script>
<script src="dist/bundle.js"></script>
</body>
</html>
5. Add index.css to set page look and feel.
body {
    background-color:#F0F0F0;
    padding: 2em;
    font-family: ‘Raleway’,’Source Sans Pro’, ‘Arial’;
   }
   .container {
    width: 50%;
    margin: 0 auto;
   }
   label {
    display:block;
    margin-bottom:5px;
   }
   input {
    padding:10px;
    width: 50%;
    margin-bottom: 1em;
   }
   button {
    margin: 1em 0;
    padding: 10px 3em;
   }
   #buttonMessage{
       float:left;
   }
   #output{
       background-color: aquamarine;
       padding: 10px 0px;
       text-align:center;
       width:50%;
       float:left;
       margin:1em 0;
   }

   #errorHolder{
    background-color: coral;
    padding: 10px;
    margin:1em 0;
    clear:both;
}
6. Add following command in scripts of package.json
"start": "node server/main.js"
run the application with following command
npm start
If all is well then you can open your browser with http://localhost:3000 and you will get "Hello World Smart Contract" heading with textbox and buttons. It means Express setup is done successfully.
Client
First we need Web3 and truffle-contract packages. To install truffle-contract package, we need to setup build-essentials on Ubuntu.
apt-get install build-essential
After that, run following command to install truffle-contract
npm install truffle-contract --save-dev
It automatically installs the needed version of web3.
Add a new file 'app.js' in client folder with following code
var Web3 = require('web3');
var TruffleContract = require('truffle-contract');

App = {
    web3Provider: null,
    contracts: {},
    currentAccount:{},
    initWeb3 : async function (){
        if (process.env.MODE == 'development' || typeof window.web3 === 'undefined'){
            App.web3Provider = new Web3.providers.HttpProvider(process.env.LOCAL_NODE);
        }
        else{
             App.web3Provider = web3.currentProvider;
        }
        web3 = new Web3(App.web3Provider);
        return  await App.initContractHelloWorld();
    },
    initContractHelloWorld : async function (){
        await $.getJSON('HelloWorld.json',function(data){
            var HelloWorldArtifact = data;
            App.contracts.HelloWorld = TruffleContract(HelloWorldArtifact);
            App.contracts.HelloWorld.setProvider(App.web3Provider);
        })
        return App.bindEvents();
    },
    bindEvents: function() {
        $('#buttonSave').click(App.setName);
        $('#buttonMessage').click(App.loadMessage);
    },
    loadMessage : function (){
        App.contracts.HelloWorld.deployed().then(async function(instance){
            let message;
            if(App.currentAccount.length){
                message = await instance.getMessage.call({from:App.currentAccount});
            }
            else{
                message = await instance.getMessage.call();
            }
            App.showMessage(message);
        }).catch((err) =>{
            App.showError(err);
        })
    },
    showMessage: function (msg){
        $('#output').html(msg.toString());
        $('#errorHolder').hide();
        $('#output').show();
    },
    showError: function(err){
        $('#errorHolder').html(err.toString());
        $('#errorHolder').show();
        $('#output').hide();
    },
    setName: function (){
        if ($('#name').val()){
             web3.eth.getAccounts(function (error,accounts){
            if (error){
                App.showError(error);
            }
            App.currentAccount = accounts[0];
            App.contracts.HelloWorld.deployed().then(function(instance){
              return instance.setName.sendTransaction($('#name').val(),{from:App.currentAccount})
            }).then(function(result){
                App.showMessage('Saved Successfully');
            }).catch(function (error){
                App.showError(error);
            })
          })
        }
        else{
            App.showError('Error: Name is required.');
        }

    },
    init : async function (){
        await App.initWeb3();
        App.loadMessage();
    }

}

$(function() {
    $(window).load(function() {
        $('#errorHolder').hide();
        $('#output').hide();

      App.init();
    });
  });
As you can see, in development mode, local private ethereum blockchain is used as web3Provider. We are using TruffleContract to access smart contract methods.
Webpack
In app.js, we are importing package/external libraries by require. As browser don't understand it so need webpack which combines all needed files in single bundled file. We will use it in index.html.
Install following packages
npm install webpack webpack-cli --save-dev
Add webpack.config.js with following webpack configurations:
require('dotenv').config();
const webpack = require('webpack');
const path = require('path');

module.exports = {
  entry: './client/app.js',
  mode: process.env.MODE,
  output: {
    filename: 'bundle.js',
    path: path.resolve(__dirname, 'client/dist')
  },
  plugins: [
    new webpack.DefinePlugin({
        'process.env': {
            'LOCAL_NODE': JSON.stringify(process.env.LOCAL_NODE),
            'MODE':JSON.stringify(process.env.MODE),
        }
    })
  ],
  node: {
    net: 'empty',
    tls: 'empty',
    dns: 'empty'
  },
  externals:[{
    xmlhttprequest: '{XMLHttpRequest:XMLHttpRequest}'
}]
};
As environment variable can't access directly on client side so it is defined in webpack.DefinePlugin. node and externals configurations are used to fix webpack errors on build.
in package.json, add following in scripts:
    "dev" : "node_modules/.bin/webpack && node server/main.js",
    "webpack": "node_modules/.bin/webpack --watch",
Run following command to check for any webpack build error.
npm run webpack
if there is no error then run following to start and test the front-end application
npm run dev
Note: First you need to start local private Blockchain, migrate the latest code and then run the front-end application.
Output
Open http://localhost:3000 link in browser, by default, "Hello World" message is displayed. When you set any name then on "Get Message" button click, you will get the name populated with Hello.

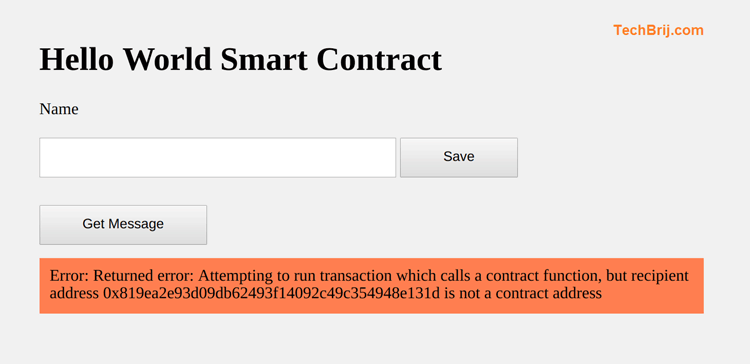
Make sure smart contract is already deployed on the local private blockchain. If you are getting error like below:

then try to do migrate again
truffle migrate --reset
and run the application
npm run dev
Conclusion
In this blog post, we implemented to setup backend and front-end application in Node.js to interact with smart contract using Web3, TruffleContract and jQuery. In next post, we will deploy smart contract using truffle and infura. Also, will deploy Node.js application to Heroku.
Stay tuned and enjoy Blockchain !!