This guide shows how to install, configure and manage a WordPress site with WordOps and WSL2 in Windows 10.
WordOps:
WordOps is a management tool for WordPress on the LEMP stack(Linux with Nginx, MySQL/MariaDB, and PHP). It simplifies WordPress deployment by automating the installation and configuration of various dependencies.
WSL2:
With WSL(Windows Subsystem for Linux), Microsoft enables you to run Linux distros directly on Windows 10 without using any Virtual machine platforms(VMWare, VirtualBox..). In this tutorial, "Ubuntu" distro is used for the development environment. It is assumed you have already WSL2 setup on Windows 10.
1. Setup Ubuntu
Open Microsoft Store in Windows 10, Select Ubuntu, It will install current LTS Ubuntu 20.04. Click Get to Install. Once it is installed, open it and enter username and password information first time.
2. Install WordOps
Run the following command to install WordOps:
wget -qO wo wops.cc && sudo bash wo
It will take few minutes. Don't press enter or interrupt the process. It might cause unexpected results.
It will ask for username and email at the end.
3. Create a WordPress Site
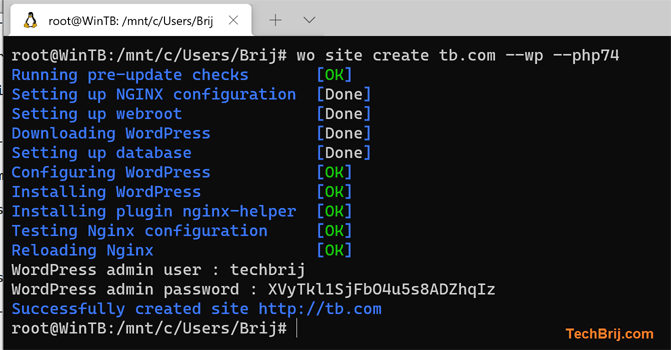
The wo site command manages websites in WordOps. Create a WordPress site tb.com with PHP 7.4.
wo site create tb.com --wp --php74
If you want to setup FastCGI Cache + Let’s Encrypt SSL certificate, you can use the following command:
wo site create tb.com --wpfc --php74 --letsencrypt
Similarly, for Redis Full-page cache + Let’s Encrypt SSL certificate, use the following command:
wo site create tb.com --wpredis --php74 --letsencrypt
But for the development environment, we will use the first command for this tutorial.
If you are getting the error related to MySQL:
pymysql.err.OperationalError: (2003, "Can't connect to MySQL server on 'localhost' ([Errno 111] Connection refused)")

OR

pymysql.err.OperationalError: (1698, "Access denied for user 'root'@'localhost'")
Then you can create another super-user and use it when you want to connect by password.
run following commands for creating super-user:
service mariadb start
sudo mysql

CREATE USER admin@localhost IDENTIFIED BY 'MY-PASSWORD';
GRANT ALL ON *.* TO admin@localhost WITH GRANT OPTION;
Replace MY-PASSWORD with the password you want to give.
Open MySQL configuration file:
nano /etc/mysql/conf.d/my.cnf
and set username = admin & password = MY-PASSWORD
close the file and restart MariaDB
service mariadb restart
Now, need to delete the existing WordPress site and create it again
wo site delete tb.com
wo site create tb.com --wp --php74
Once site creation is complete, WordOps reports the admin user name and auto-generated password to access the WordPress admin panel.
You can update WordPress admin password with the following command if you want:
wo site update tb.com --password
4. Set as default site
We will set it as the default site, run the following command to edit Nginx configuration:
wo site edit tb.com
Open in nano editor, add listen port for the site
server {
listen 80 default_server;
listen [::]:80 default_server;

server_name tb.com www.tb.com;
We need to disable the existing default site:
rm /etc/nginx/sites-enabled/default
Test the configuration and restart the service
nginx -t
service nginx reload
if you want to check what ports are used to listen by Nginx, run the following command:
ss -tlpn| grep nginx
5. Setup Hosts
Open Notepad with "Run as administrator" and open windows hosts file at the following location
%SystemRoot%\System32\drivers\etc\hosts
Set following:
127.0.0.1 tb.com
::1 tb.com
Now when tb.com is used, windows will check internal instead of going public/other networks.
From command prompt, run "wsl --shutdown" and open Ubuntu terminal again
In Ubuntu terminal, check host file
nano /etc/hosts
Ensure the changes are reflected here. Now you need to start the services manually
wo stack start --web
service mariadb start
OR
service nginx start
service php7.4-fpm start
service mariadb start
You can follow my previous post to auto-start services on Windows 10 startup.
Open tb.com in the browser, you will get WordPress default page.
Useful WordOps Commands
Here are some useful WordOps site commands:
wo site list # to get list of all sites

wo site info tb.com # to get site information

wo site show tb.com # to display site Nginx configuration

wo site disable tb.com # to disable site Nginx vhost

wo site enable tb.com # to enable site Nginx vhost
Install WordOps Dashboard and Backend:
wo stack install --admin
It will install WordOps Dashboard, PHPmyAdmin, Adminer, Opcache, Netdata, MySQLTuner ..etc.
wo stack remove --admin # remove stack without data and configurations
wo stack purge --admin # remove stack with data and configurations
To get configuration information related to Nginx, PHP and MySQL
wo info --nginx
wo info --mysql
wo info --php74
If you want to clean up all stacks
wo stack purge --all
To Uninstall WordOps
wget -qO wo wops.cc && sudo bash wo --purge
Here is more information on WordOps commands.
Conclusion
WordOps provides a fast and automated way for WordPress stack installation, administration and monitoring. WSL 2 is good for the development environment without leaving your Windows 10 machine. It will save a bunch of time. You can access the files on both sides.
In windows run, type \\wsl$ to access Ubuntu files and use /mnt/c/ or /mnt/d/ to access Windows c or d drive in Ubuntu. Similarly, VSCode supports WSL file access with Remote- WSL Extension for development.
Hope, It helps.